
Integration with ThingsBoard
This guide shows how to connect ThingsBoard to TBMQ using the ThingsBoard MQTT Integration, so that data published by MQTT clients to TBMQ becomes device telemetry in ThingsBoard.
The ThingsBoard MQTT Integration acts as an ordinary MQTT client: it connects to TBMQ, subscribes to a topic filter, and converts each received message into telemetry and attribute updates using an uplink data converter. This guide configures it as an APPLICATION client with a persistent session, so messages published while ThingsBoard is offline are queued by TBMQ and delivered on reconnect.
Prerequisites
Section titled “Prerequisites”- A running ThingsBoard PE instance, or a ThingsBoard Cloud tenant with integrations enabled
- A running TBMQ instance reachable from ThingsBoard
- The
mosquitto_pubMQTT client, to publish a test message
How the connection works
Section titled “How the connection works”Four settings decide whether ThingsBoard receives every message or only the ones published while it happens to be connected. Three of them live on the ThingsBoard side, one on the TBMQ side:
| Setting | Configured in | Value used here | Why it matters |
|---|---|---|---|
| Client type | TBMQ client credentials | Application |
TBMQ creates a dedicated Kafka topic, tbmq.msg.app.$CLIENT_ID, for each persistent APPLICATION client and delivers from it with a per-client consumer. This is the high-throughput path intended for a backend consumer such as ThingsBoard. |
| Clean session | ThingsBoard integration → Advanced settings | off | Makes the MQTT session persistent, so TBMQ retains the subscription and queues matching messages while ThingsBoard is disconnected. Left on (the ThingsBoard default), nothing is queued and offline messages are lost. |
| Client ID | ThingsBoard integration → Advanced settings | fixed, e.g. tbpeintegration |
The per-client Kafka topic is derived from the client ID. With the ThingsBoard default of an auto-generated ID, every reconnect produces a different ID, so the integration resumes a brand-new empty session instead of the one holding its queued messages. |
| QoS | ThingsBoard integration → topic filter | 1 or 2 |
Persistence applies only at QoS 1 and above. If either the subscriber or the publisher uses QoS 0, the message takes the non-persistent path and is dropped when the subscriber is offline. |
TBMQ setup
Section titled “TBMQ setup”Create the client credentials that ThingsBoard will use to connect.
These credentials use Basic authentication, which is the one authentication provider TBMQ enables out of the box. If it was turned off on your instance, re-enable it on the Authentication → Providers page before continuing.
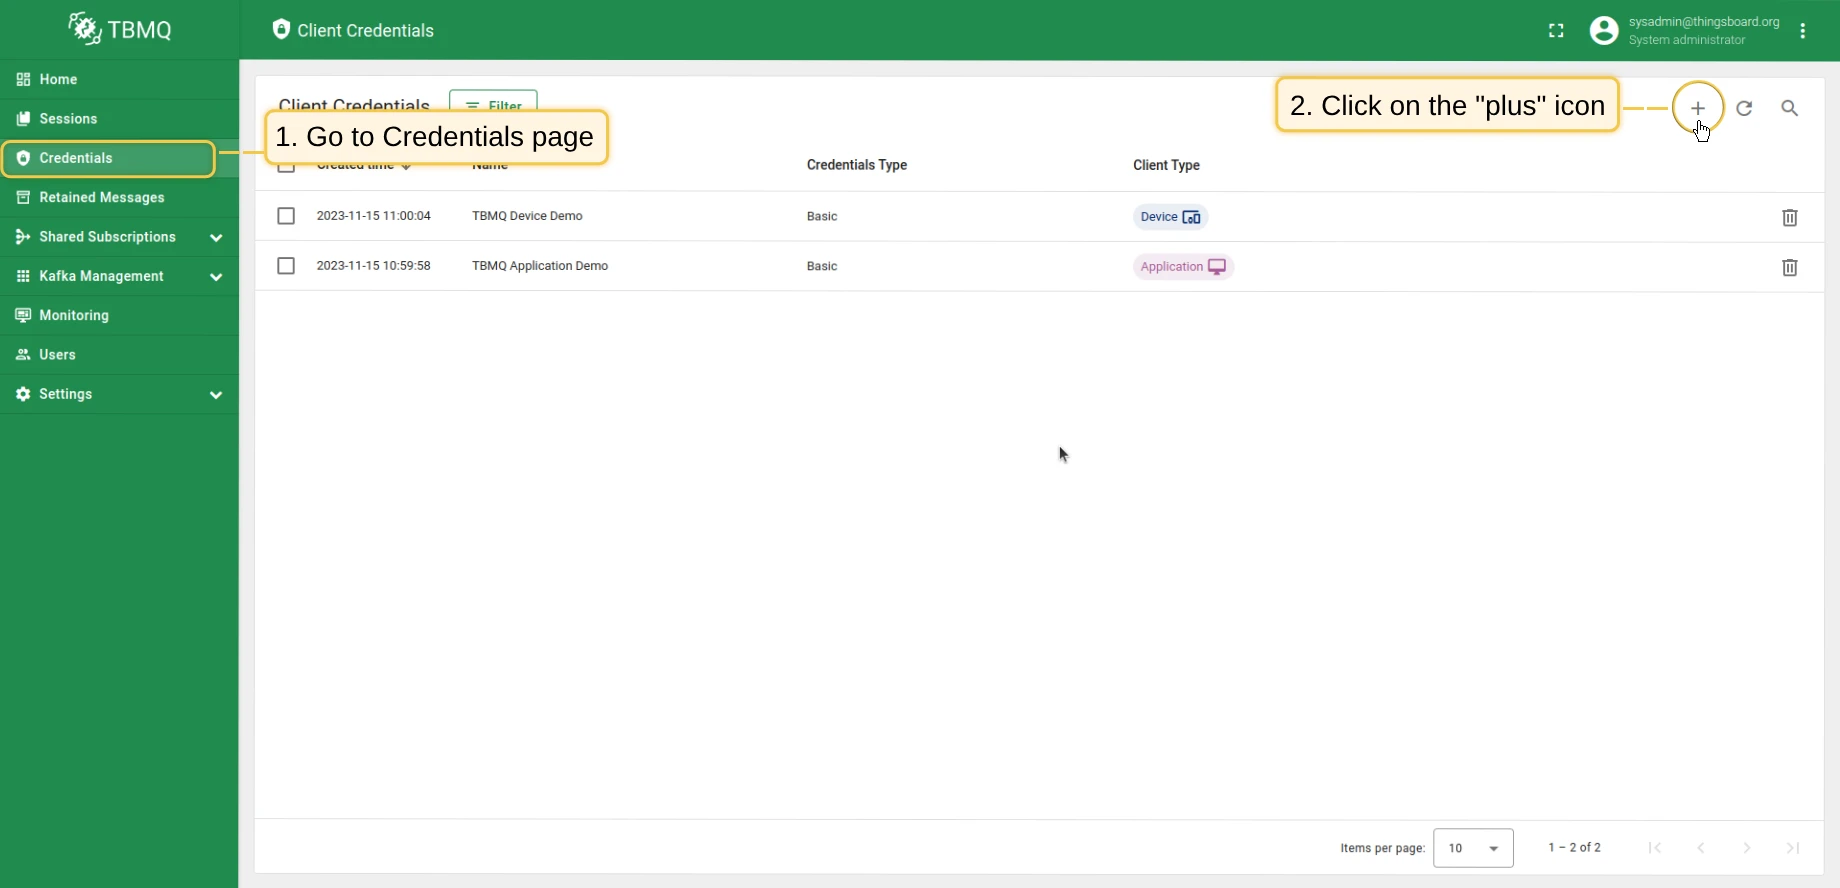
- In the TBMQ UI, go to Authentication → Credentials and click Add (+).
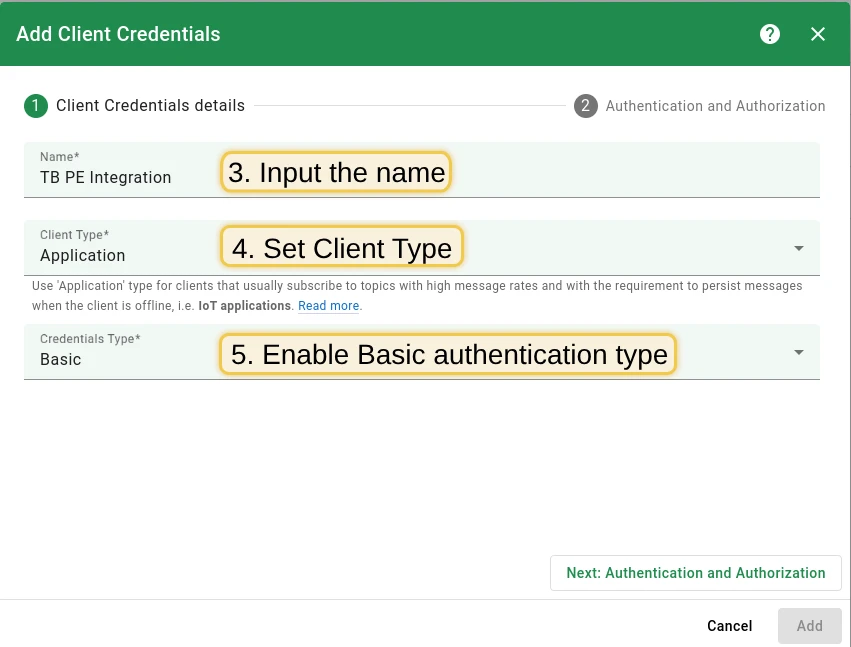
- Enter a credential name and select Application as the client type.
- Select Basic as the credentials type.
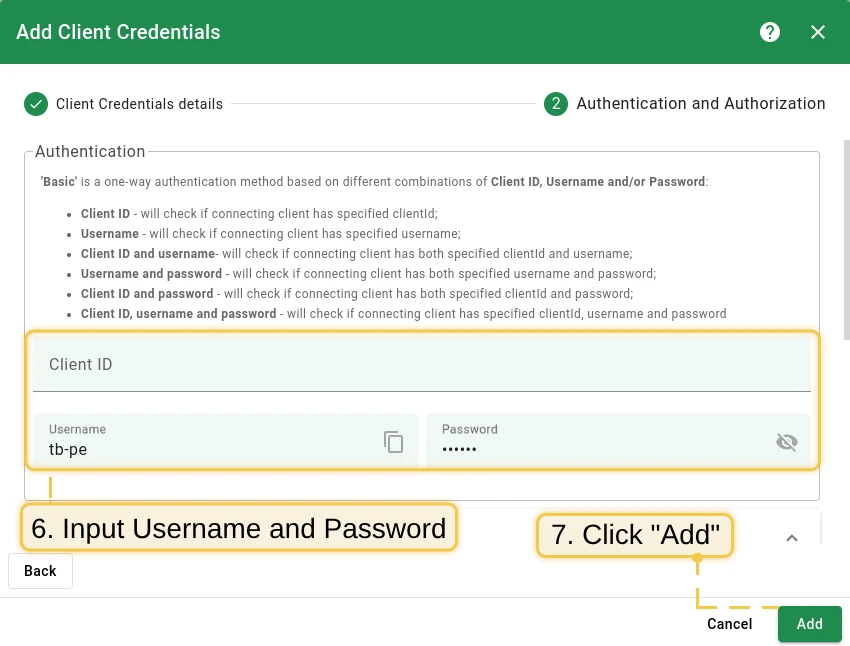
- Enter a Username and Password (e.g.,
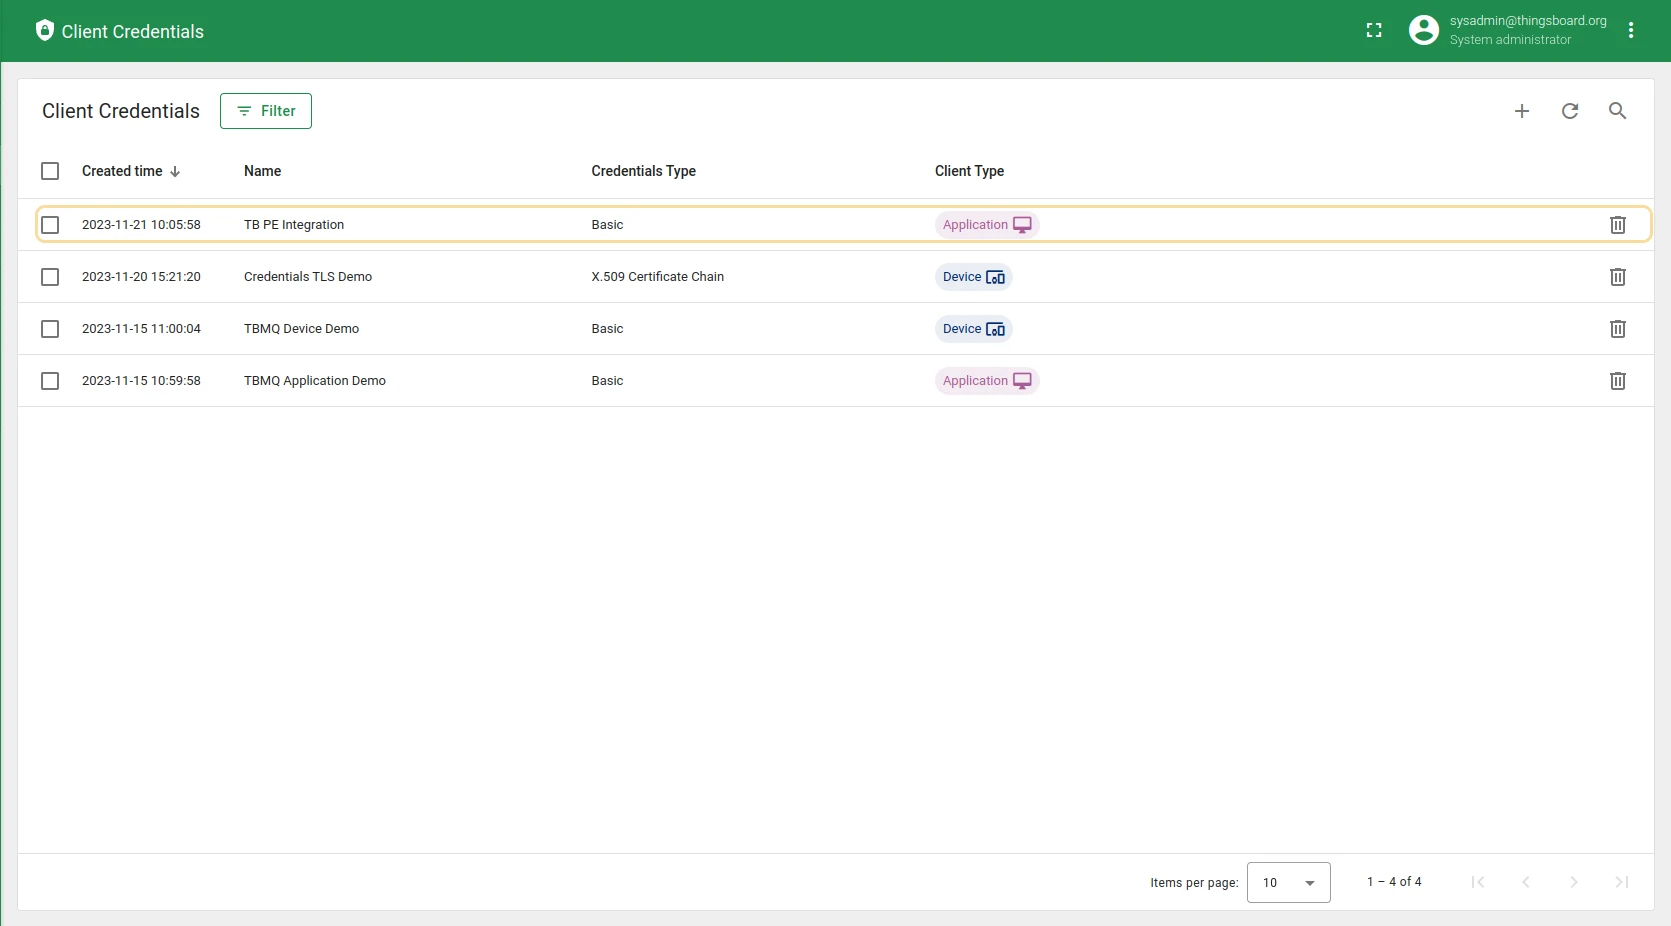
tb-pe/secret). - Click Add.
ThingsBoard setup
Section titled “ThingsBoard setup”Create an uplink converter
Section titled “Create an uplink converter”The uplink converter parses each incoming MQTT message — payload plus metadata such as the topic it arrived on — into the device name, attributes, and telemetry that ThingsBoard stores.
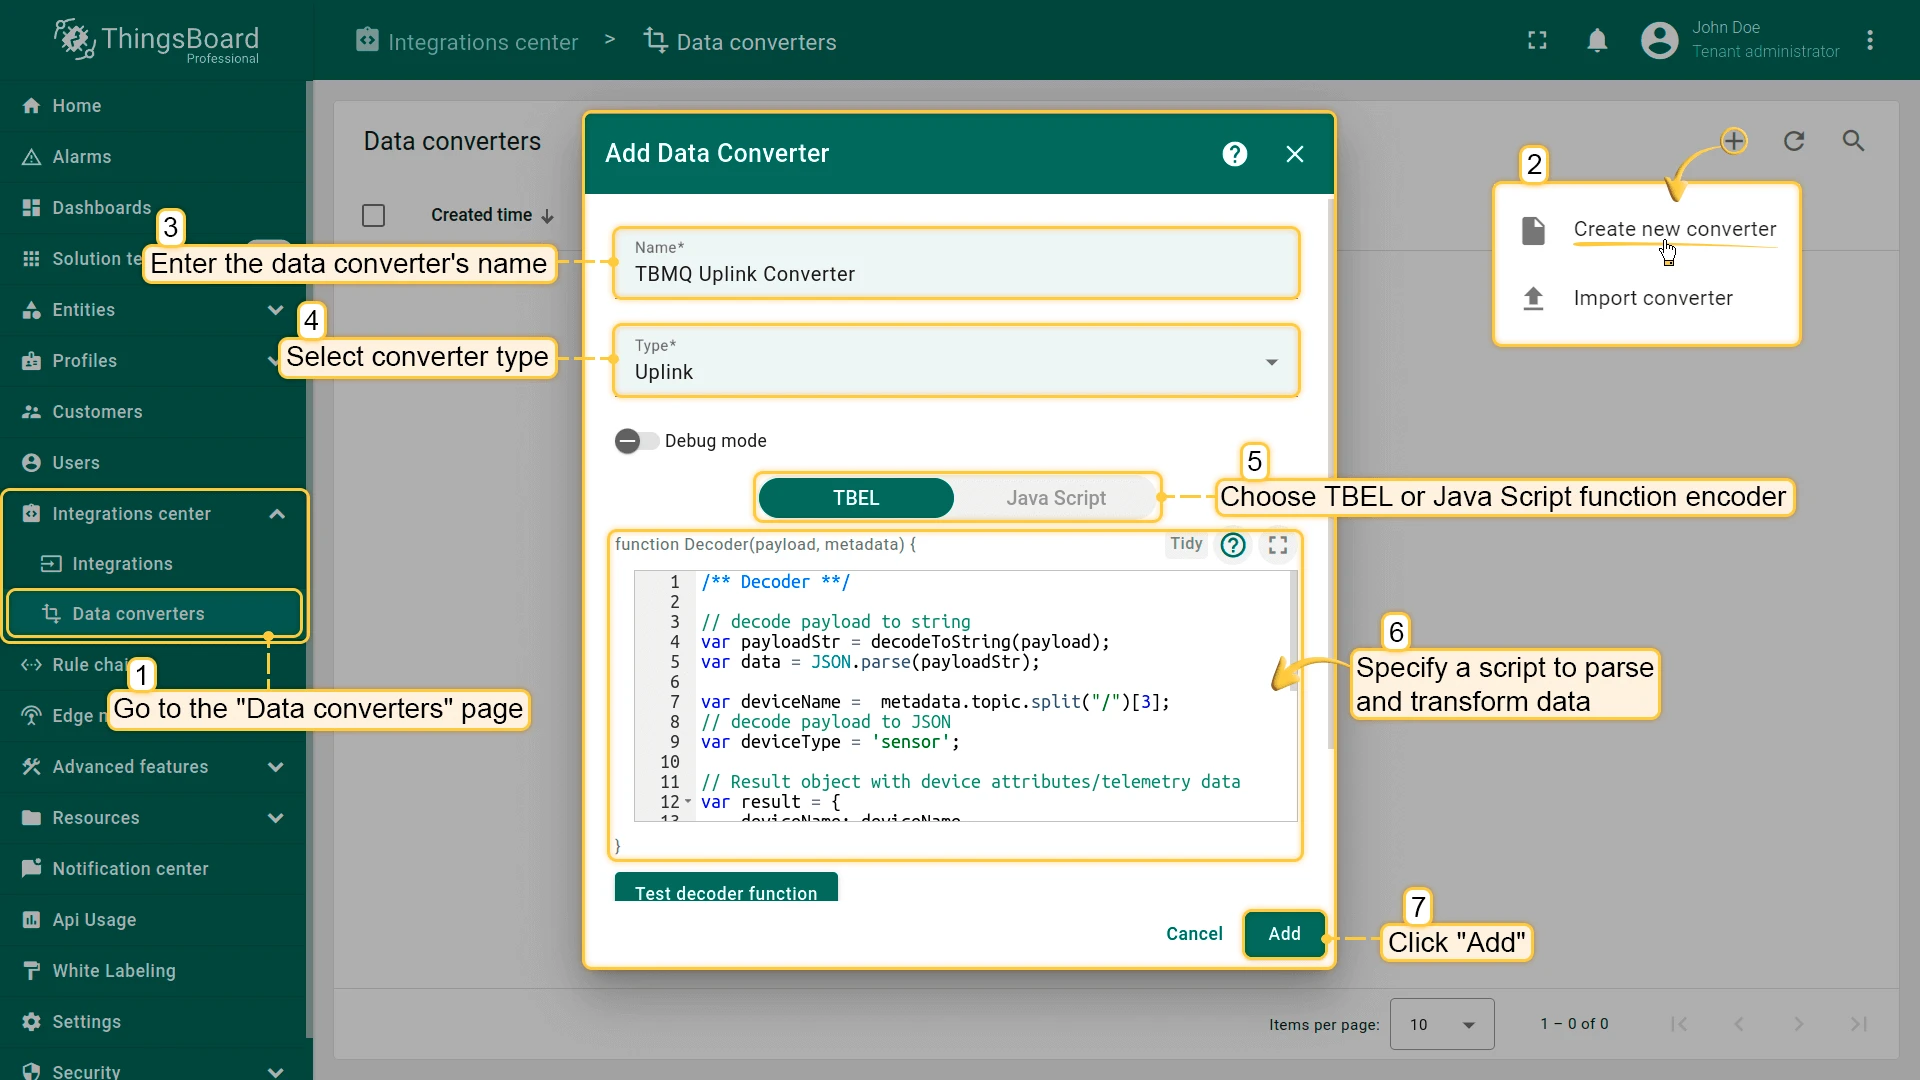
In ThingsBoard, go to Integrations center → Data converters and add a converter. Name it TBMQ Uplink Converter,
select type Uplink, and paste the decoder script below.
The script takes the device name from the fourth topic segment, so a message on
tb/mqtt-integration-tutorial/sensors/SN-001/temperature is attributed to device SN-001.
/** Decoder **/
// decode payload to stringvar payloadStr = decodeToString(payload);var data = JSON.parse(payloadStr);
var deviceName = metadata.topic.split("/")[3];var deviceType = 'sensor';
// Result object with device attributes/telemetry datavar result = {    deviceName: deviceName,    deviceType: deviceType,    attributes: {        integrationName: metadata['integrationName'],    },    telemetry: {        temperature: data.value,    }};
/** Helper functions 'decodeToString' and 'decodeToJson' are already built-in **/
return result;
/** Decoder **/
// decode payload to stringvar payloadStr = decodeToString(payload);var data = JSON.parse(payloadStr);
var deviceName = metadata.topic.split("/")[3];var deviceType = 'sensor';
// Result object with device attributes/telemetry datavar result = { deviceName: deviceName, deviceType: deviceType, attributes: { integrationName: metadata['integrationName'], }, telemetry: { temperature: data.value, }};
/** Helper functions **/
function decodeToString(payload) { return String.fromCharCode.apply(String, payload);}
function decodeToJson(payload) { var str = decodeToString(payload); var data = JSON.parse(str); return data;}
return result;Create an MQTT integration
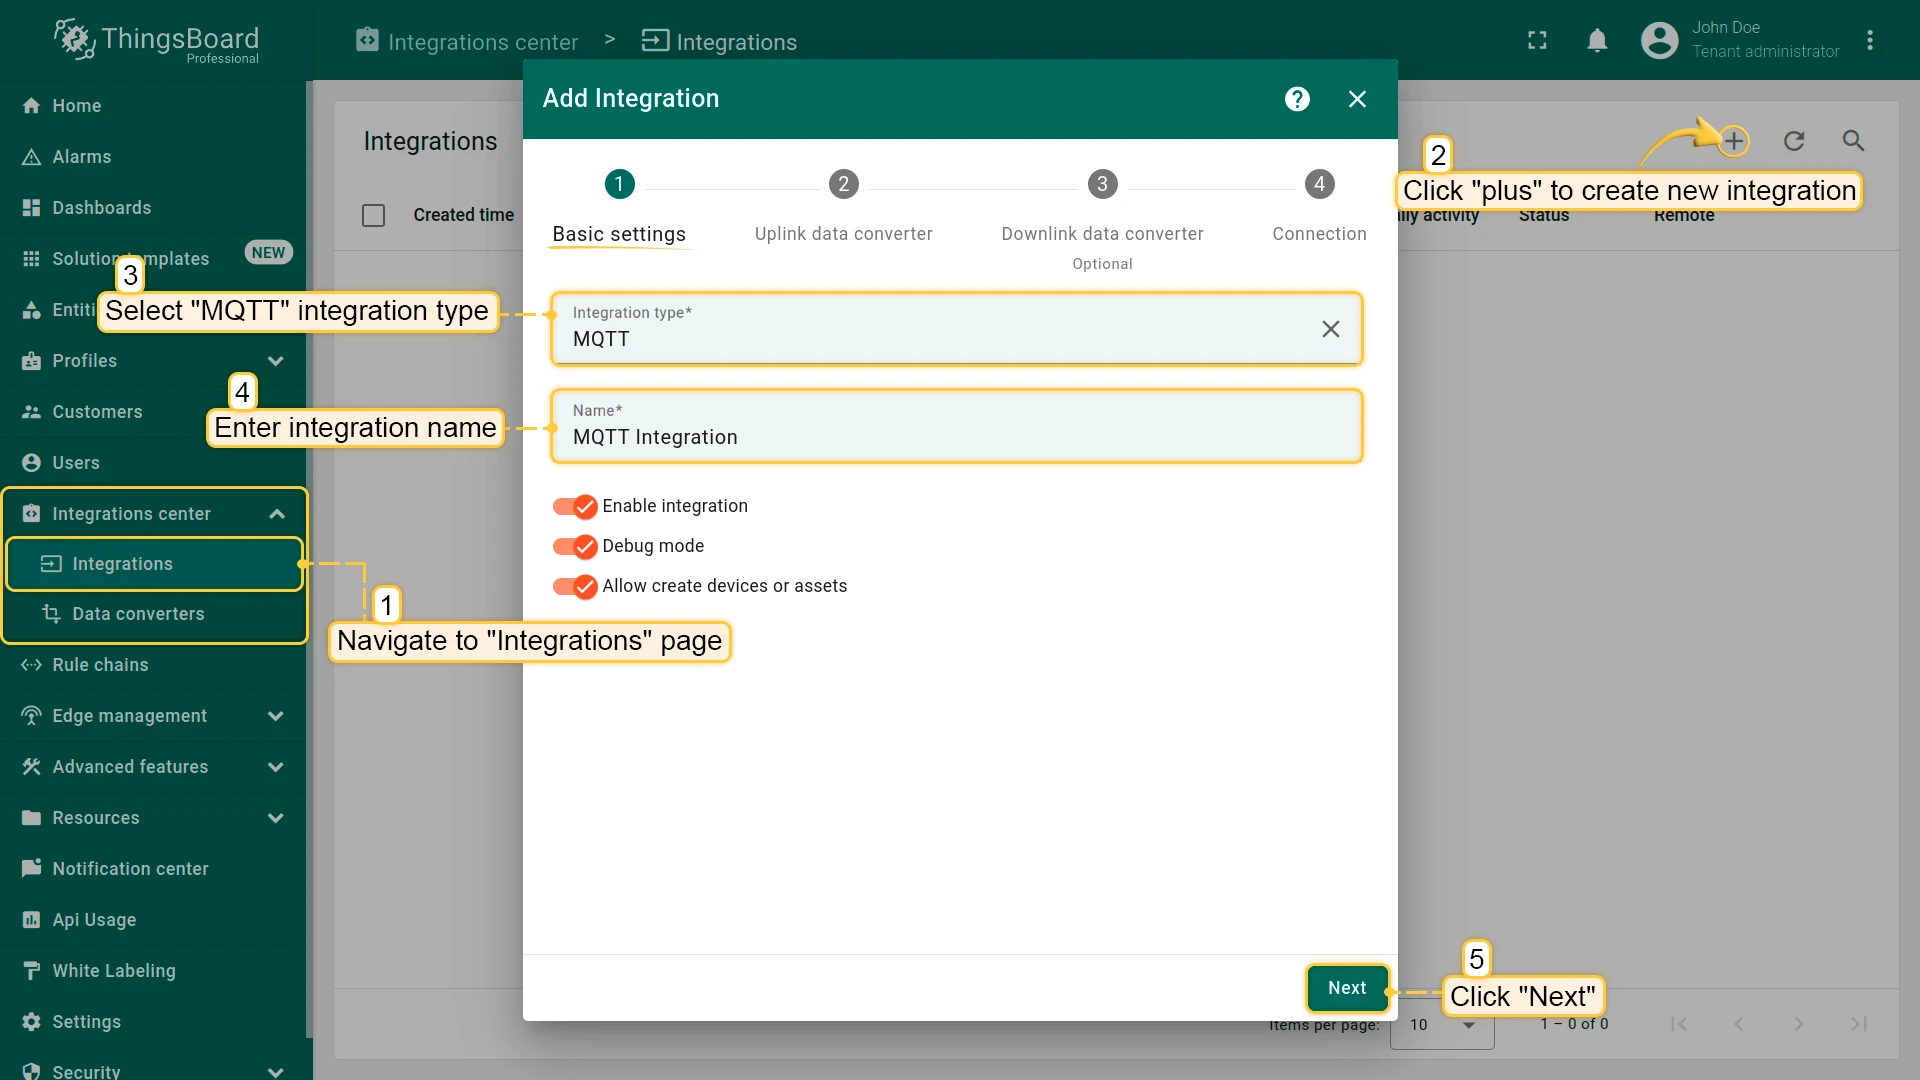
Section titled “Create an MQTT integration”- Go to Integrations center → Integrations and click + Add integration. Set Integration type to MQTT,
name it
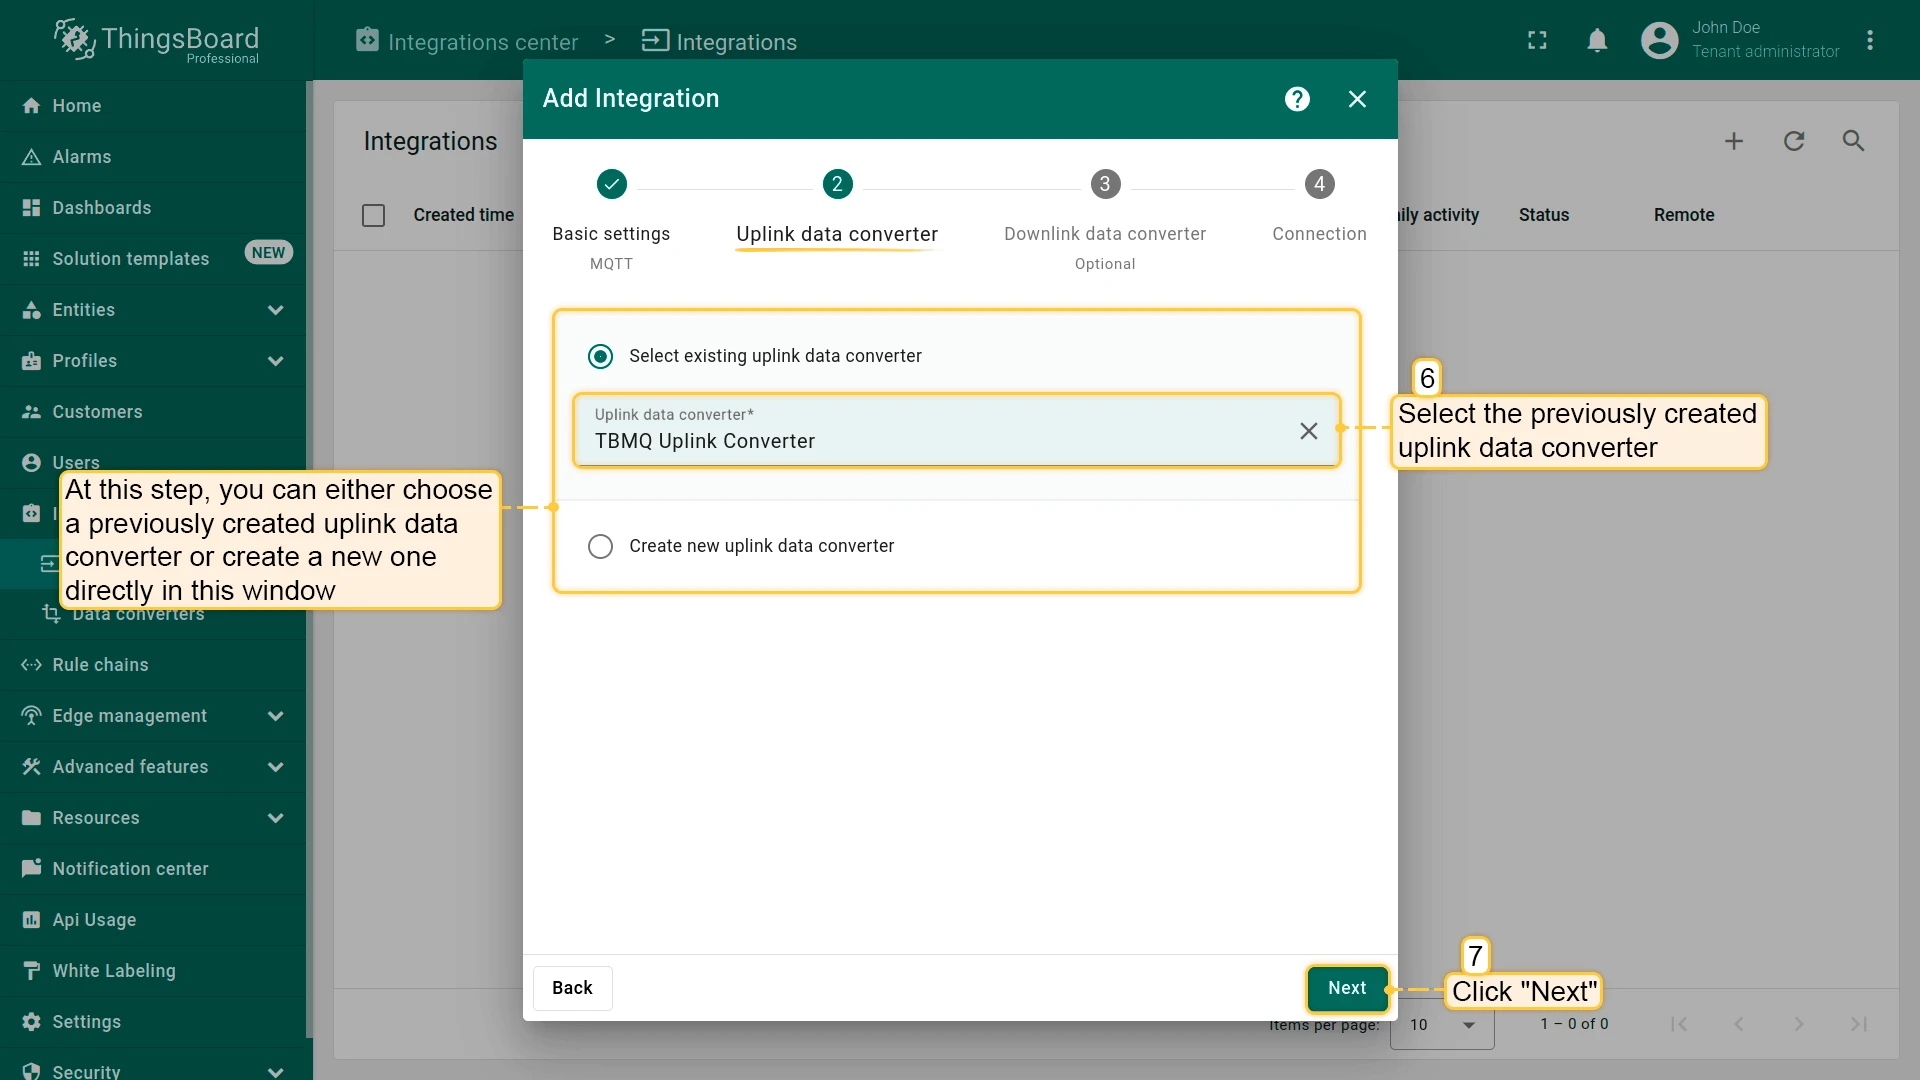
MQTT Integration, and continue to the next step. - Select the
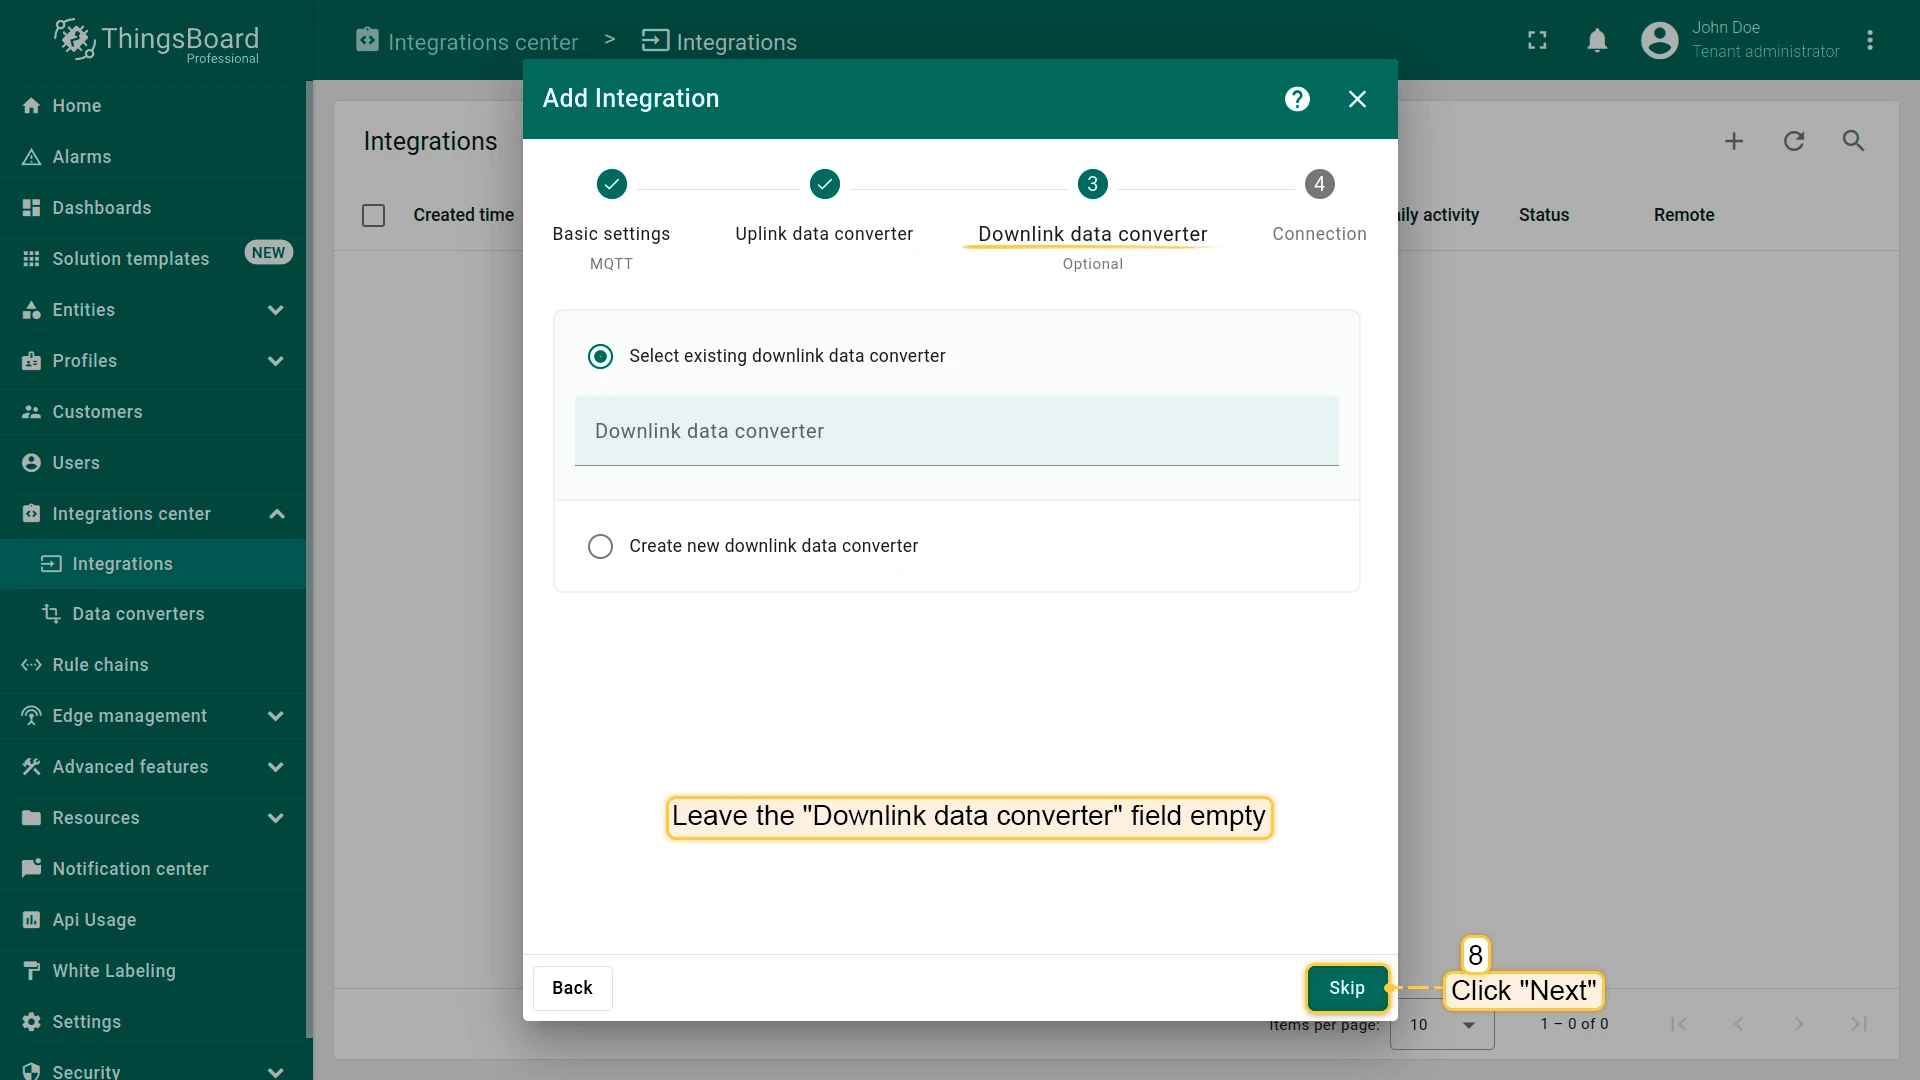
TBMQ Uplink Converteryou just created. - Leave the Downlink data converter field empty and click Skip — a downlink converter is only needed to send commands back to devices, which is covered in Downlink and RPC.
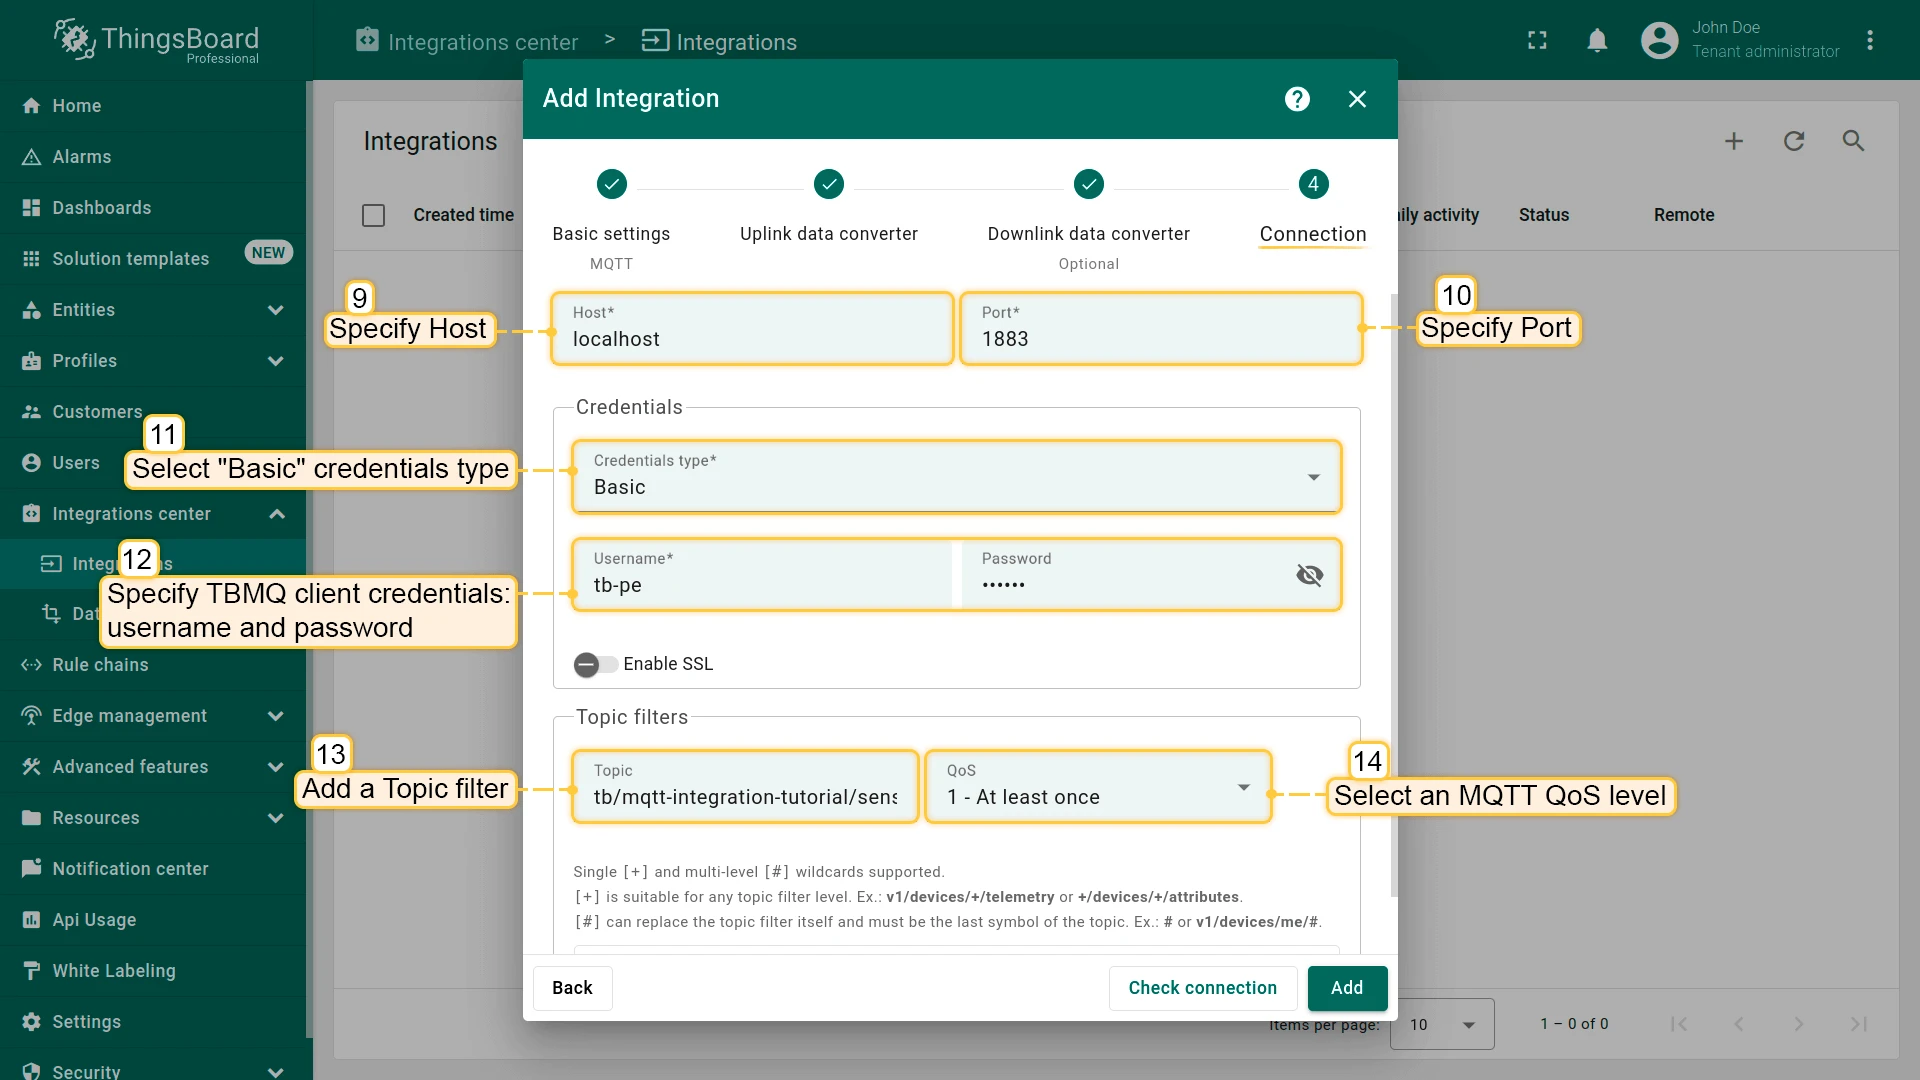
- Specify the TBMQ Host and Port (
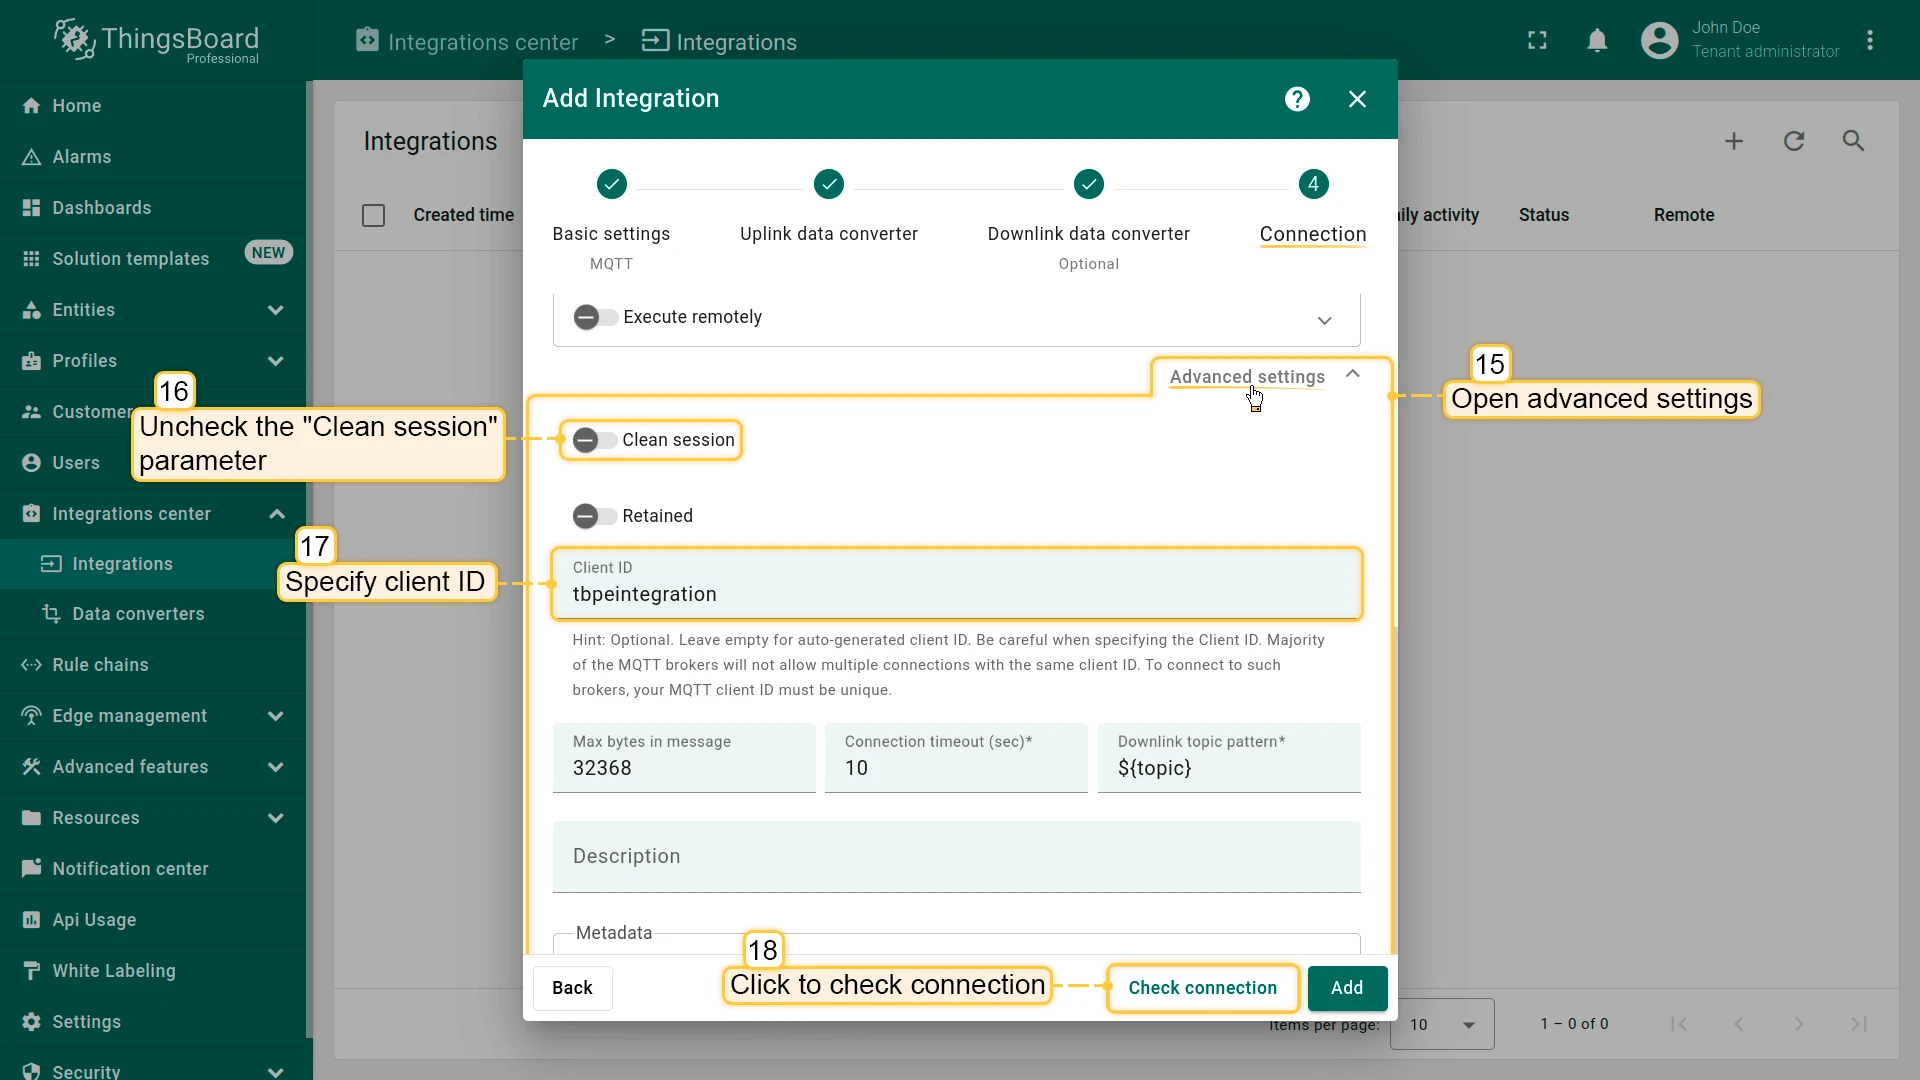
1883for the default TBMQ TCP listener). Select Basic credentials and enter the username and password created above. Add the topic filtertb/mqtt-integration-tutorial/sensors/+/temperatureand set QoS to1or2. - Open Advanced settings. Uncheck Clean session and set Client ID to
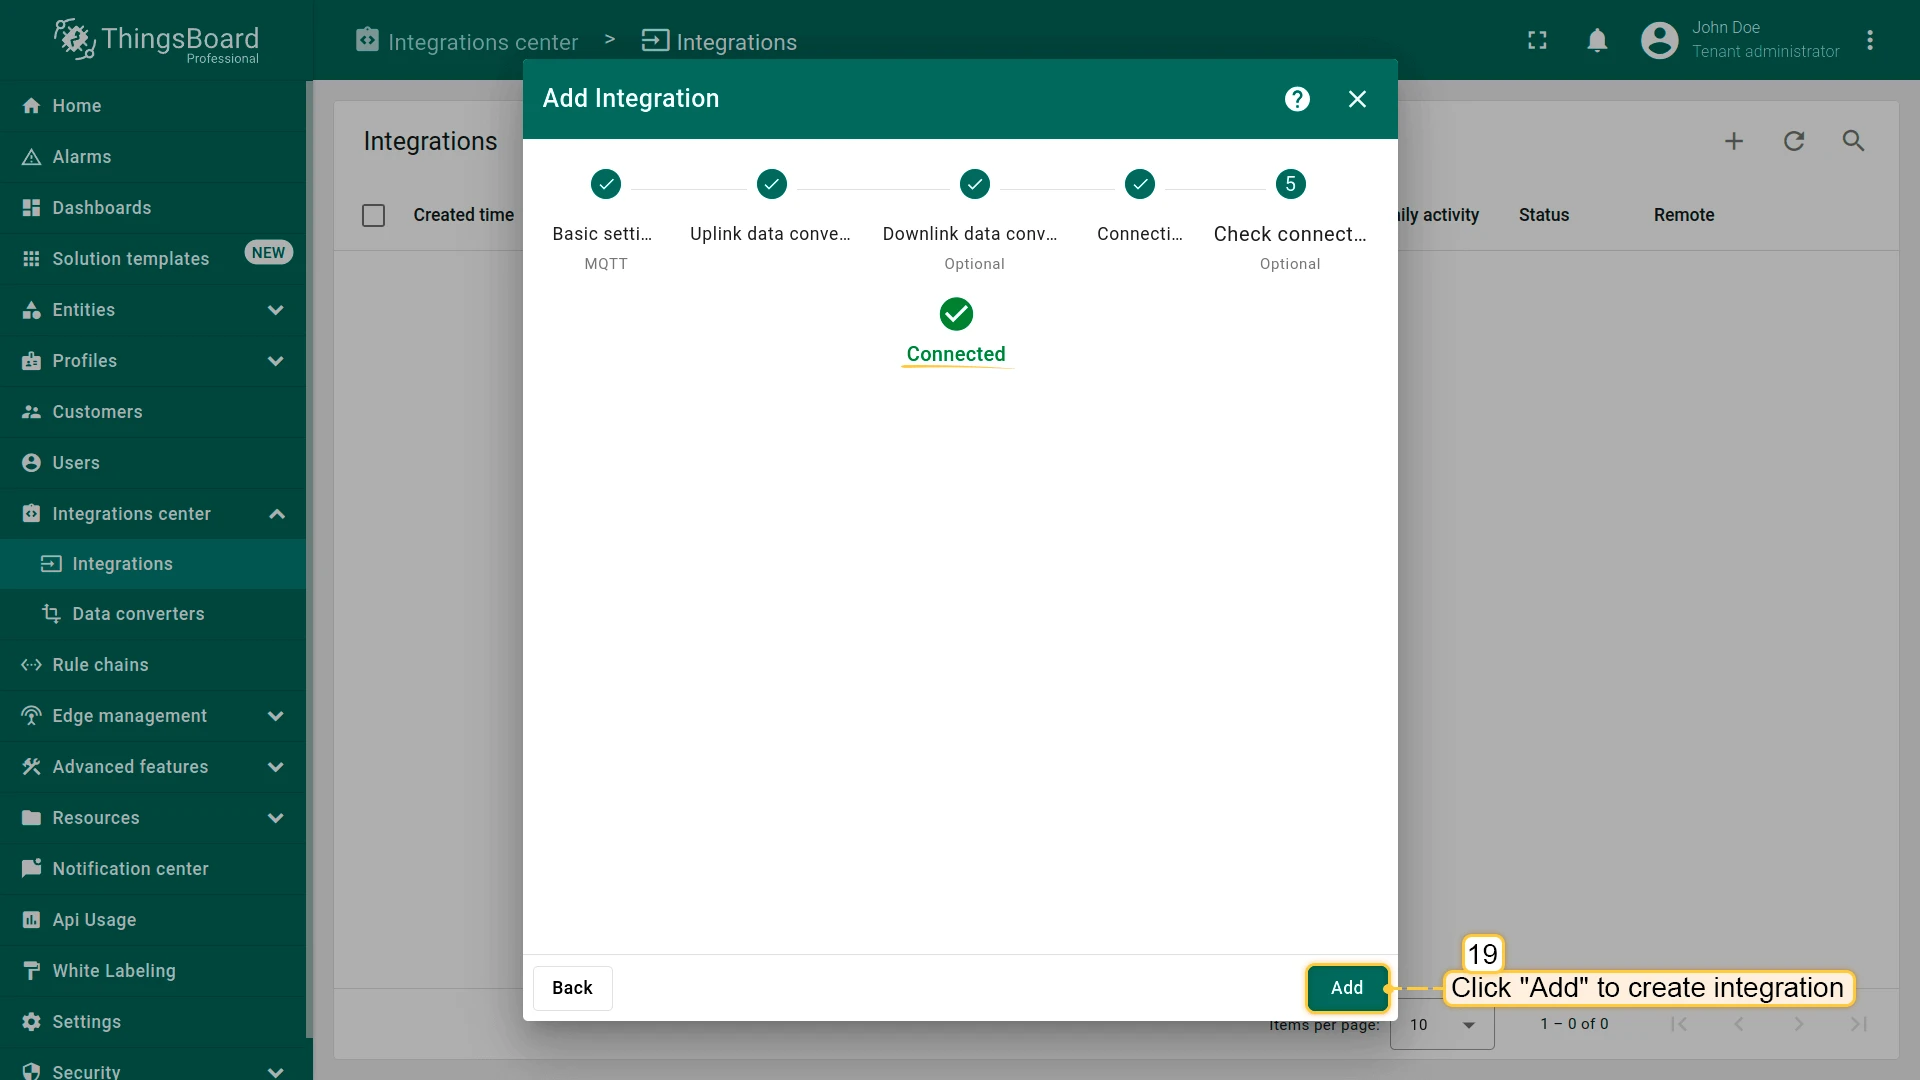
tbpeintegration. - (Optional) Click Check connection to verify TBMQ is reachable. Click Add to create the integration.
Verify the connection
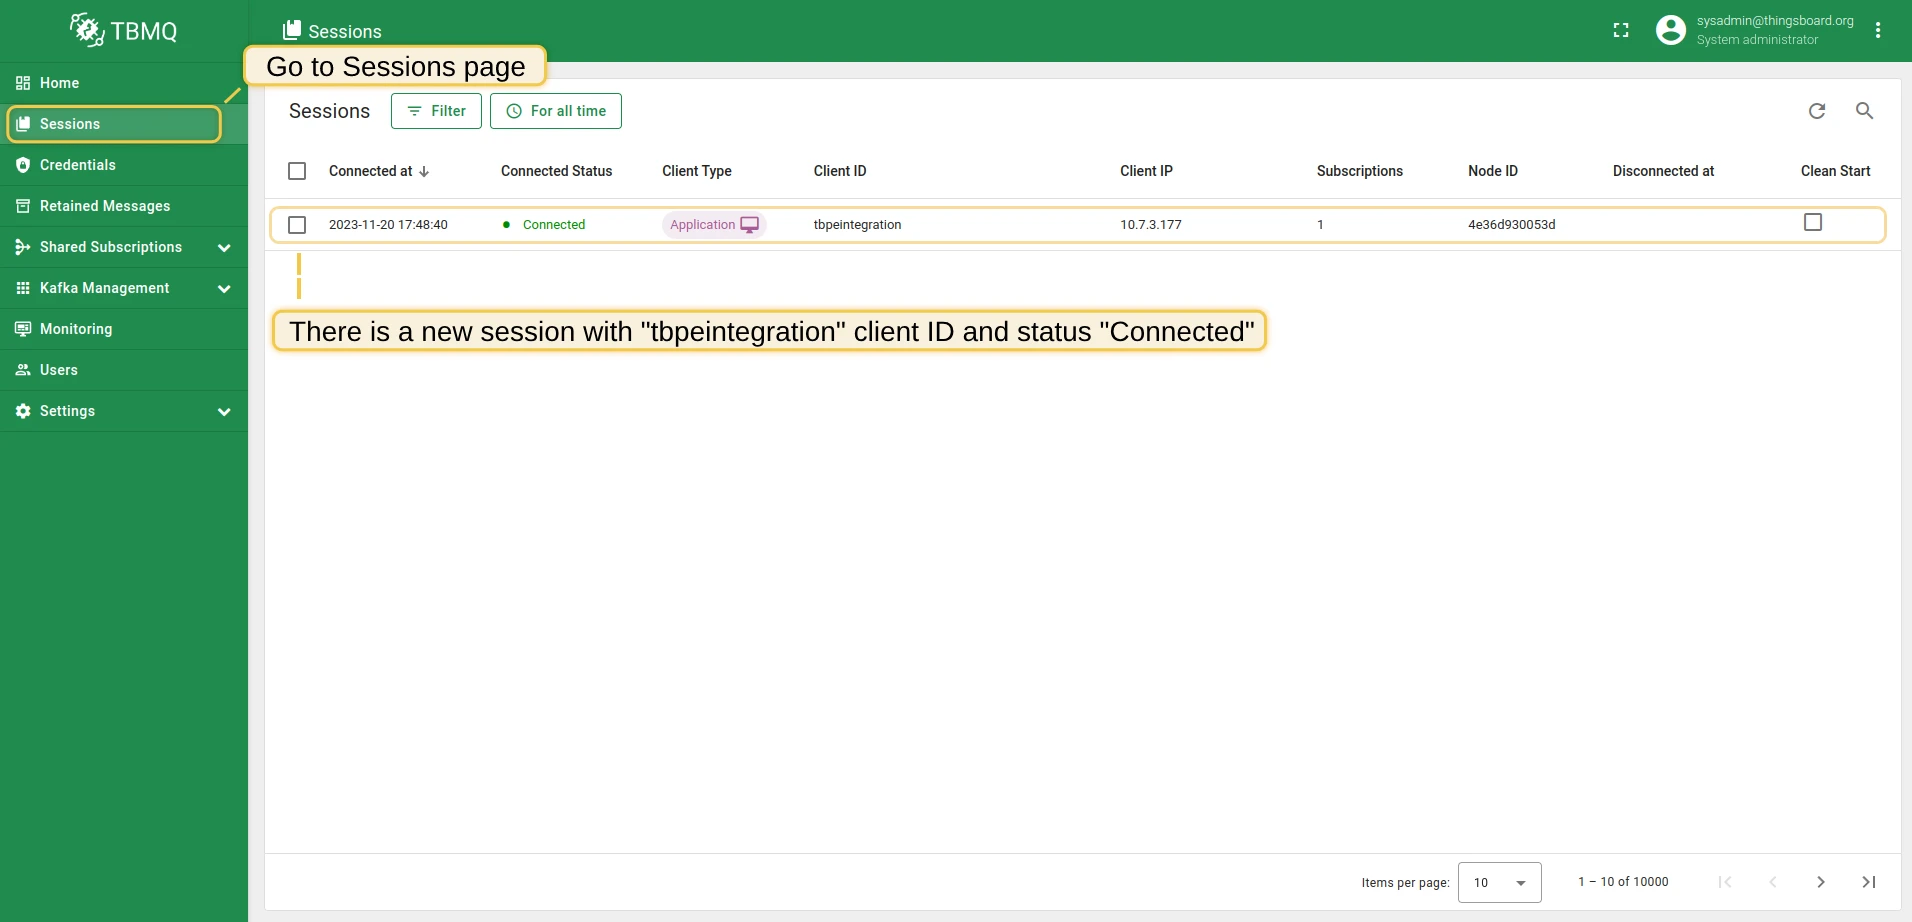
Section titled “Verify the connection”Once the integration is created, open the Sessions
page in the TBMQ UI. A session for client ID tbpeintegration should be listed with status Connected, client type
APPLICATION, and marked as persistent.
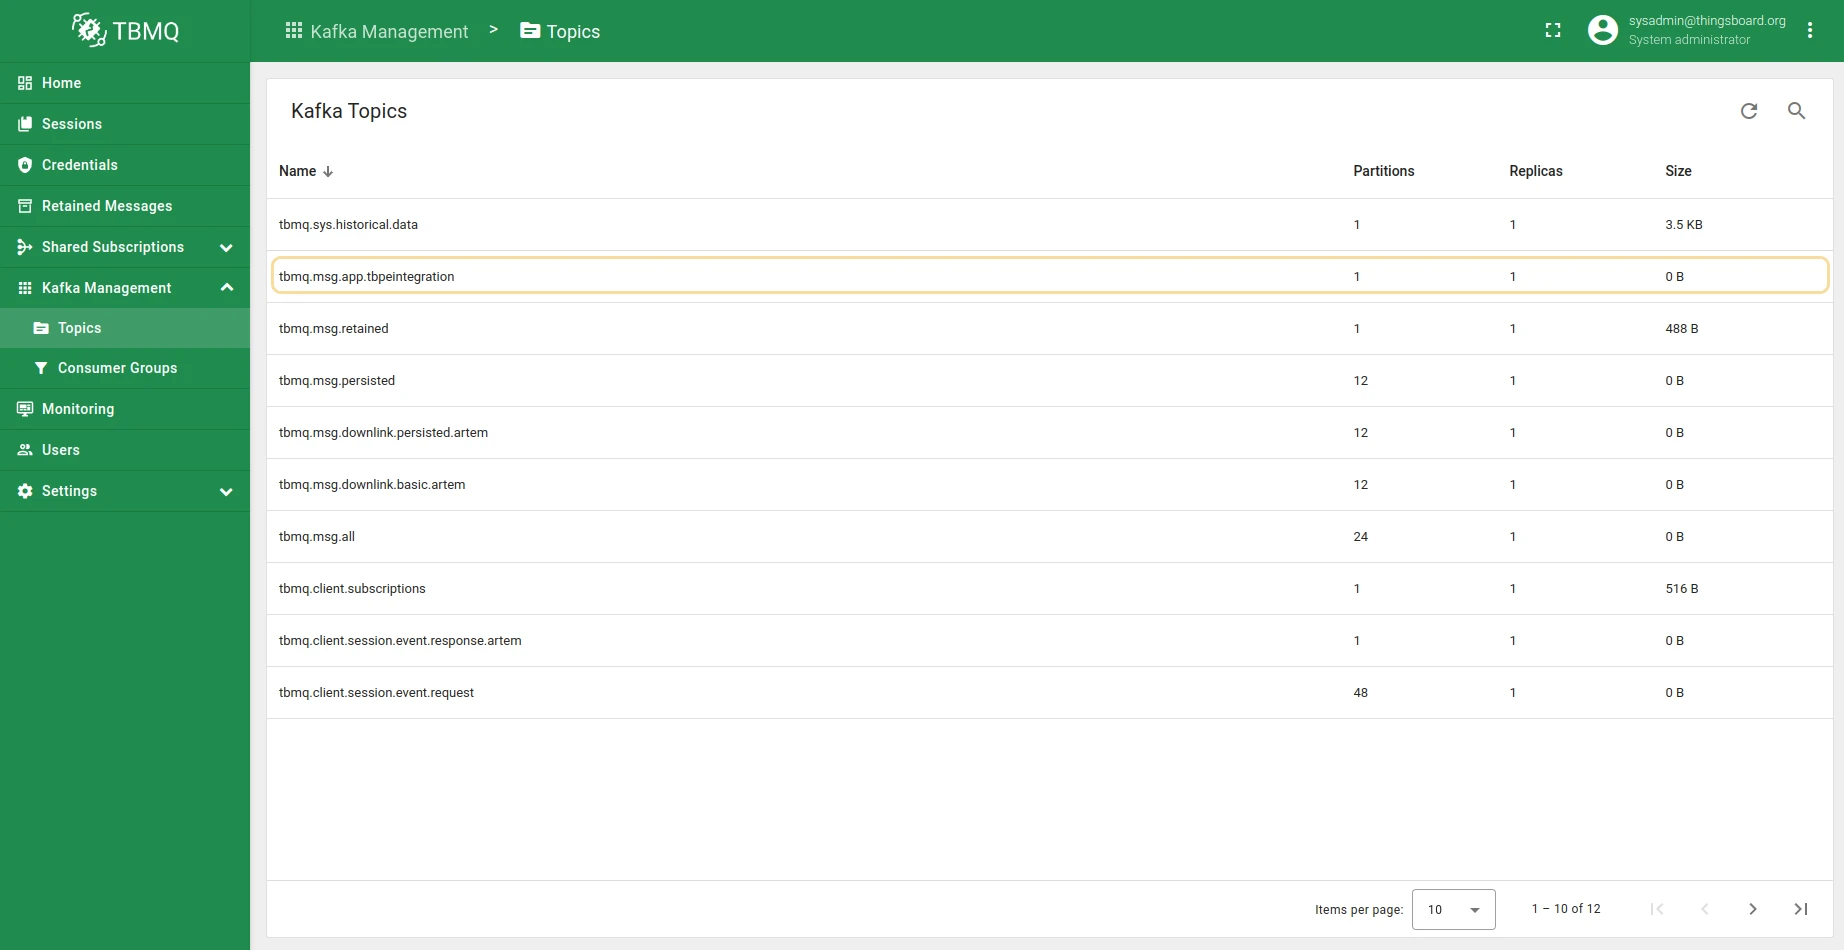
Because the client is a persistent APPLICATION client, TBMQ has also created its dedicated Kafka topic. Open
Kafka management → Topics and look for tbmq.msg.app.tbpeintegration, listed with its partitions, replicas, and
size.
Send an uplink message
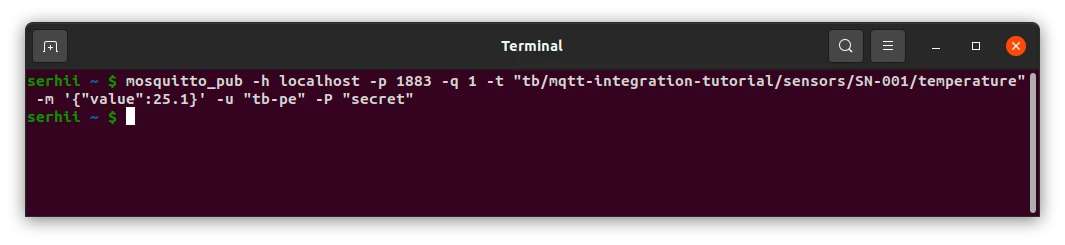
Section titled “Send an uplink message”Publish a temperature reading as a device would. Replace the host and credentials with your own if you changed them:
mosquitto_pub -h localhost -p 1883 -q 1 \ -t "tb/mqtt-integration-tutorial/sensors/SN-001/temperature" \ -m '{"value":25.1}' -u "tb-pe" -P "secret"The -q 1 is deliberate: at QoS 0 the message would skip the persistent path, so it would be lost rather than queued if
ThingsBoard happened to be disconnected.
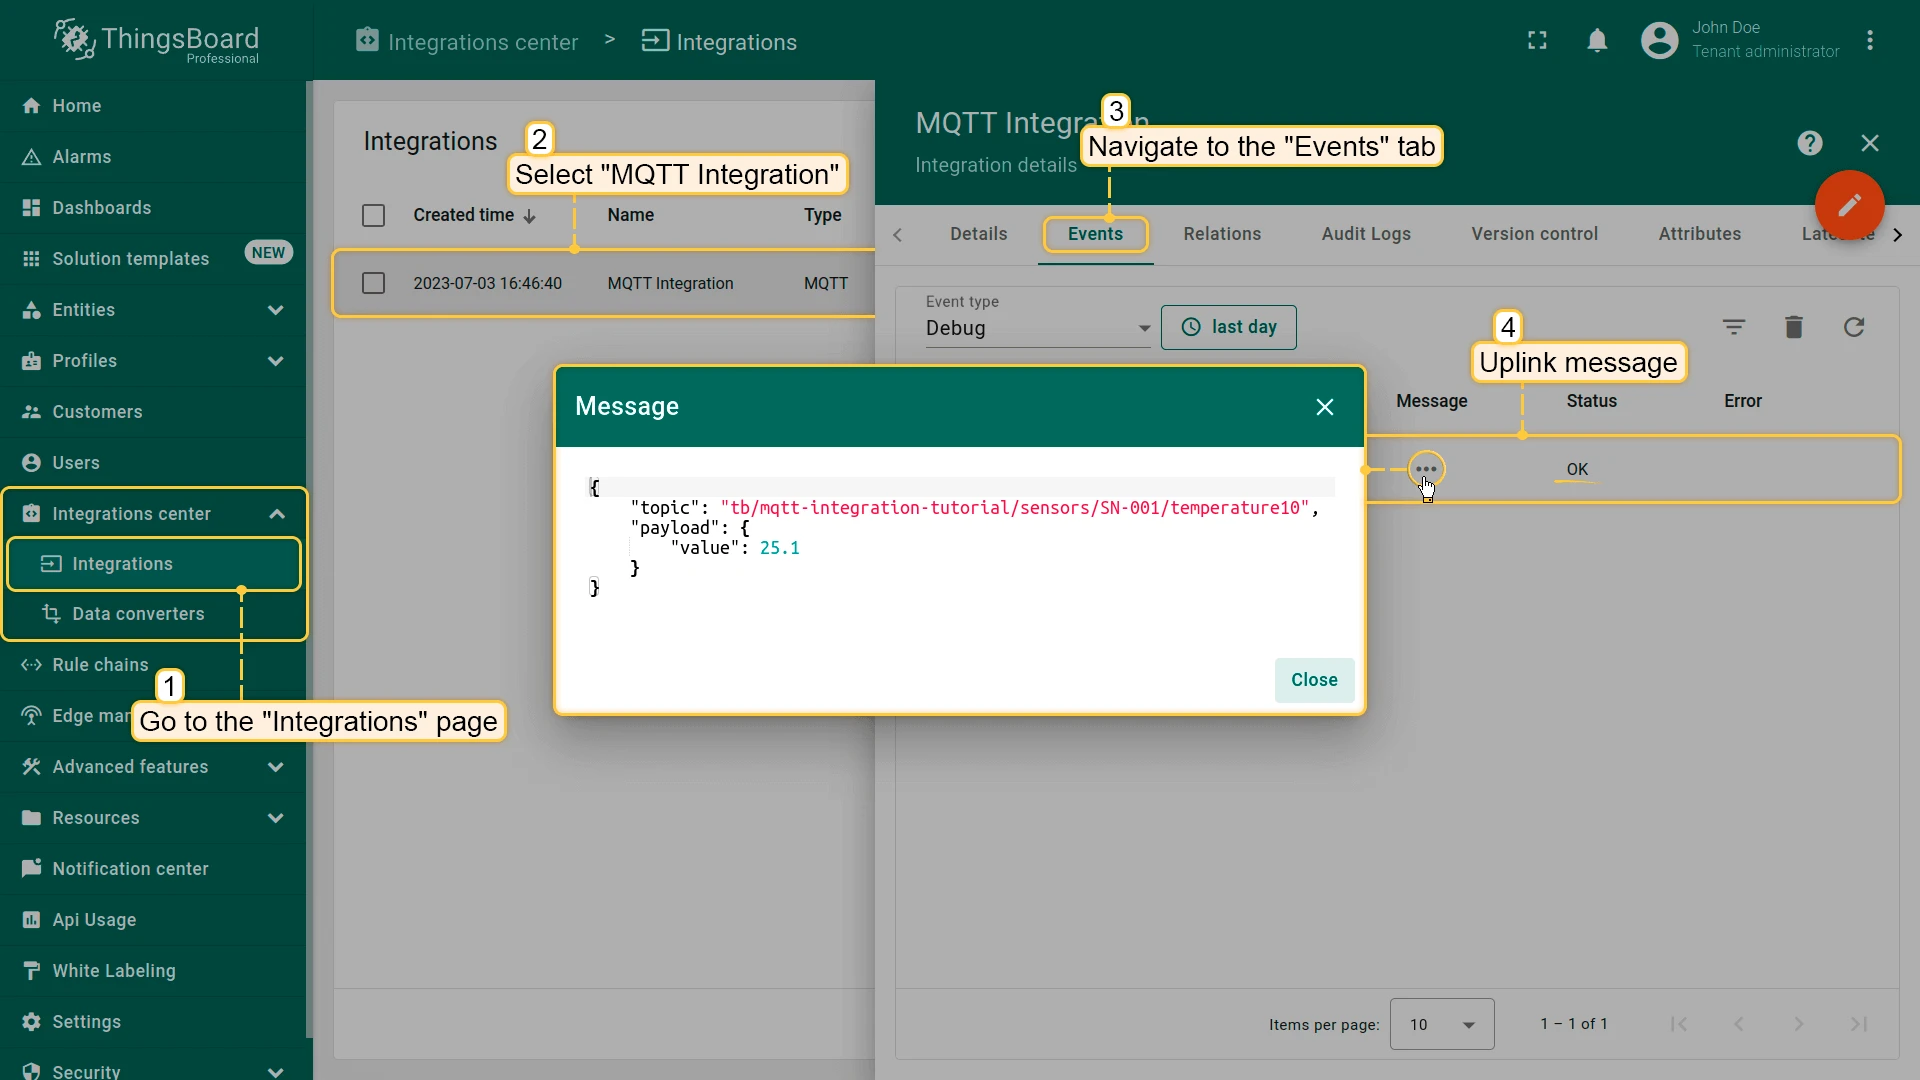
In ThingsBoard, open the MQTT integration and go to its Events tab. An uplink event should show the message as received and converted.
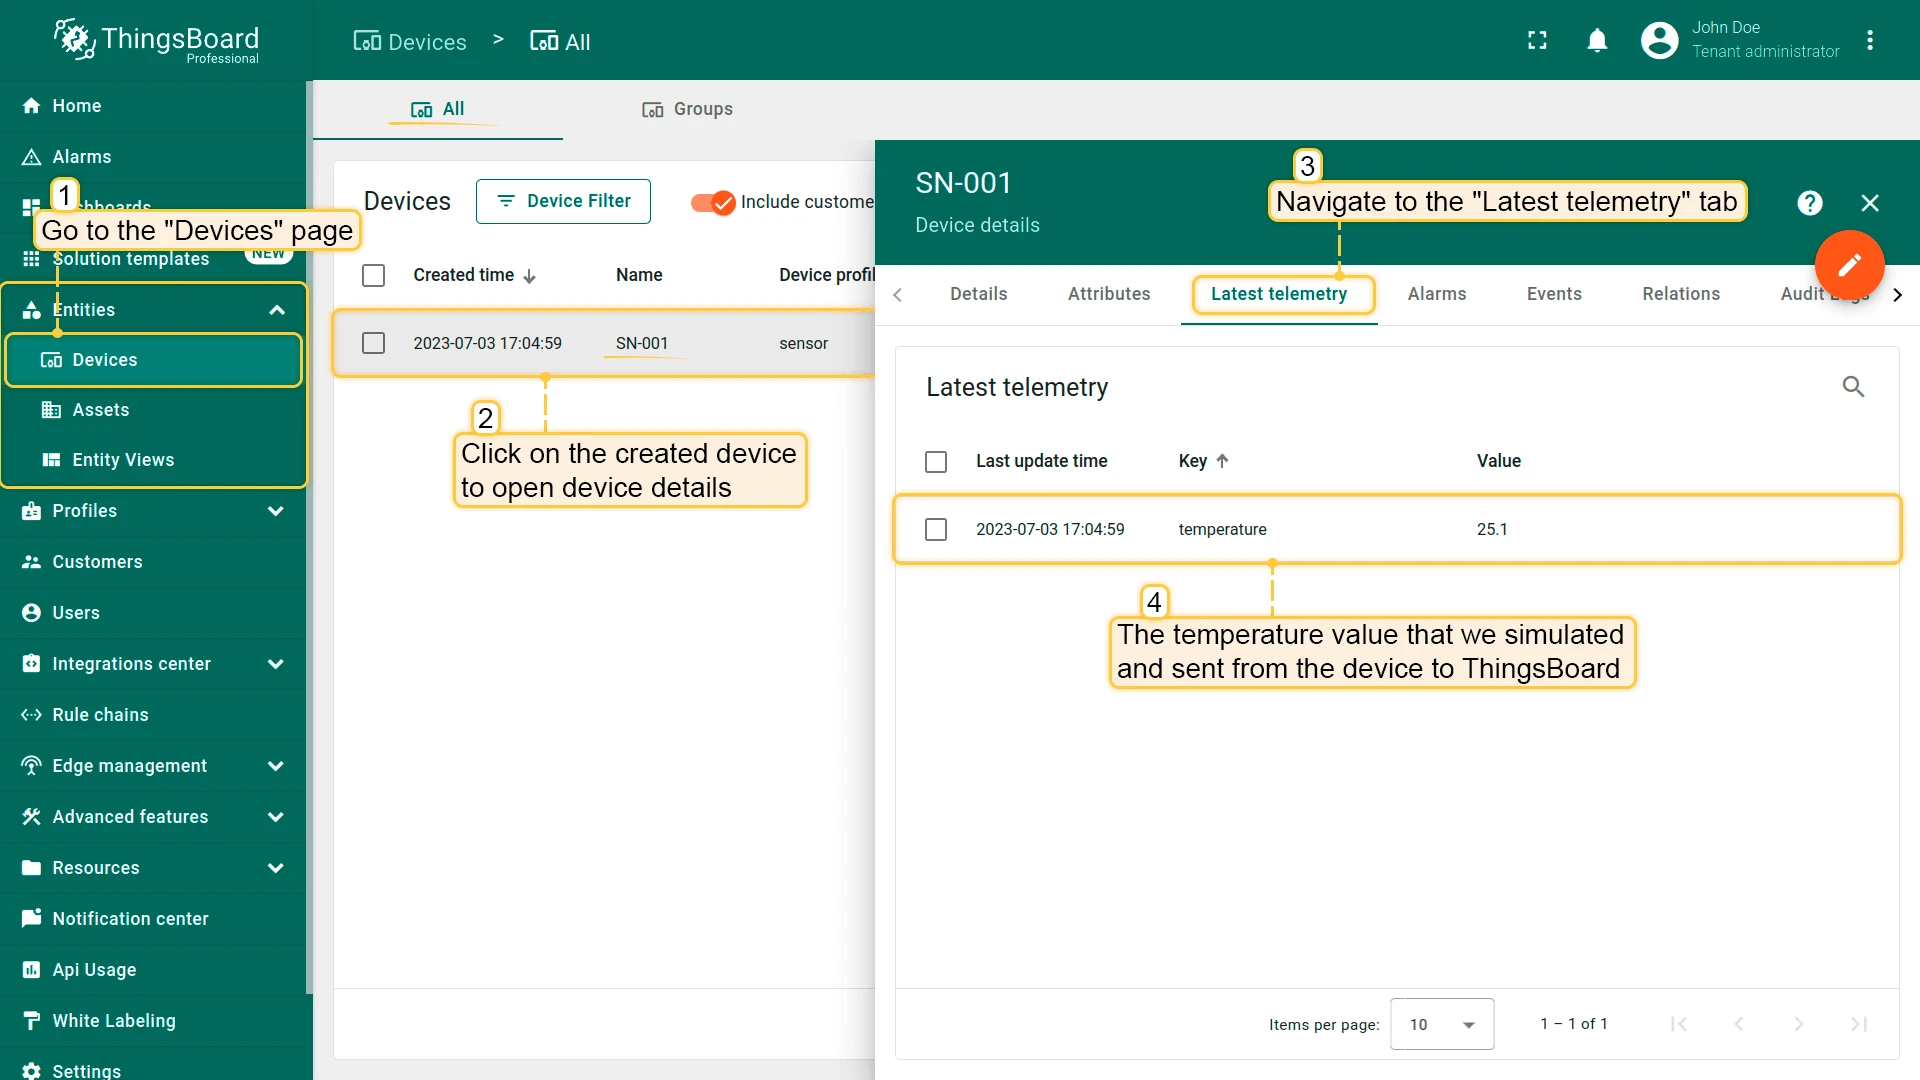
Then go to Entities → Devices. The integration provisions a device named SN-001 on first message. Open it and
switch to the Latest telemetry tab — the temperature key should hold 25.1.
To confirm the offline queueing actually works, disable the integration in ThingsBoard, publish a few more messages at QoS 1, then re-enable it. The messages queued in TBMQ are delivered as soon as the integration reconnects.
Downlink and RPC
Section titled “Downlink and RPC”This guide covers uplink only. To send commands from ThingsBoard back to devices through TBMQ, add a downlink data
converter to the integration: ThingsBoard encodes the Rule Engine message and publishes it to TBMQ, where the device is
subscribed. The downlink topic comes from the integration’s Downlink topic pattern setting, which resolves
metadata.topic from the converter output.
The encoder API and the RPC walkthroughs live in the ThingsBoard documentation:
- MQTT Integration — downlink setup and troubleshooting
- Downlink data converter — the full encoder function reference
Troubleshooting
Section titled “Troubleshooting”| Symptom | Likely cause | What to check |
|---|---|---|
| Integration status is Disconnected, no session in TBMQ | TBMQ is not reachable, or the connection was refused | Confirm the host and port, and that a firewall or security group is not blocking 1883. Use Check connection in the integration settings. |
| Connection refused and the client appears under Authentication → Unauthorized clients in TBMQ | Wrong username or password, or Basic authentication is disabled | The Unauthorized clients table records the reason for each rejected CONNECT. Verify the credentials and that the Basic provider is enabled. |
| Session connects but is not persistent, and TBMQ warns about it | Clean session is still enabled on the integration | Uncheck Clean session in the integration’s Advanced settings. |
| Live messages arrive, but nothing published while ThingsBoard was down | QoS 0 somewhere in the chain, or a non-persistent session | Both the publisher and the integration’s topic filter must use QoS 1 or 2. See Quality of service. |
| A new Kafka topic appears after each reconnect, queued messages are never delivered | Client ID is left empty, so ThingsBoard generates a new one per connection | Set a fixed Client ID in Advanced settings. Messages queued under a previous ID stay in that session’s topic until the session is cleared. |
| Connection rejected even though credentials are correct | The broker’s APPLICATION client limit is reached | MQTT_APPLICATION_CLIENTS_LIMIT caps the total number of persistent APPLICATION clients and external system integrations. It defaults to 0, which disables the limit. |
| Events appear in TBMQ but the converter produces no telemetry | The payload does not match the decoder script | Open the converter’s Events tab in ThingsBoard to see the raw payload and the conversion output. The sample script expects JSON shaped like {"value":25.1} and a five-segment topic. |
Next steps
Section titled “Next steps”- TBMQ client type — how DEVICE and APPLICATION clients are persisted and delivered
- Non-persistent and persistent sessions — what a persistent session retains
- MQTT over SSL — secure the connection between ThingsBoard and TBMQ
- TBMQ integrations — the reverse direction, where TBMQ itself pushes messages out to HTTP, Kafka, or another MQTT broker
Was this helpful?