Public demo broker
Nothing to install. Connect to demo.tbmq.io and publish your first message in under a minute.
The UI is read-only. See Try live demo.
By the end of this guide you will have a broker to talk to, a set of MQTT client credentials, and a message published by one client and received by another — with the client session visible in the TBMQ UI. If the protocol itself is new to you, start with how MQTT publish/subscribe works.
Start by choosing where the broker runs:
Nothing to install. Connect to demo.tbmq.io and publish your first message in under a minute.
The UI is read-only. See Try live demo.
Docker on your own machine, with administrative access to every setting. Takes a few minutes. See Install TBMQ locally.
For the components behind the broker and the path a message takes through them, see Architecture.
The fastest way to try TBMQ is the free public broker at demo.tbmq.io — a shared sandbox you can publish to right away.
| Parameter | Value |
|---|---|
| Host | demo.tbmq.io |
| MQTT port | 1883 |
| MQTT over TLS port | 8883 |
| Username | demo |
| Password | (leave empty) |
Sign up for a free account to open the TBMQ UI and watch your own sessions, subscriptions, and broker statistics as you go.
This section covers the quickest path to your own broker: Docker on a single host. For every other option — Docker Compose cluster, Kubernetes, cloud, Helm — see Installation options.
Have your license key ready before you install — the broker will not start without one. If you don’t have a key yet, visit the Pricing page to compare subscription plans and perpetual licenses, and to size your deployment.
Run the following commands to download and start TBMQ:
wget https://raw.githubusercontent.com/thingsboard/tbmq-pe-docker-compose/release-2.4.1/basic/tbmq-install-and-run.sh &&sudo chmod +x tbmq-install-and-run.sh && ./tbmq-install-and-run.shWith Docker Desktop installed, run the steps below in PowerShell.
Open PowerShell as Administrator.
(Optional) Check the current execution policy.
It determines whether PowerShell is allowed to run scripts. If it returns Restricted, PowerShell runs no scripts at all.
Get-ExecutionPolicy(Optional) Change the execution policy.
Choose the least permissive setting that lets the install script run and still meets your security requirements.
Unrestricted allows all scripts.
Set-ExecutionPolicy UnrestrictedDownload and start TBMQ.
Invoke-WebRequest -Uri "https://raw.githubusercontent.com/thingsboard/tbmq-pe-docker-compose/release-2.4.1/basic/windows/tbmq-install-and-run.ps1" `-OutFile ".\tbmq-install-and-run.ps1"; .\tbmq-install-and-run.ps1The script downloads docker-compose.yml into the current directory, creates the Docker volumes, installs the database,
starts the broker, and then follows the container logs. Press Ctrl+C to stop following them — the broker keeps running in the background.
The docker-compose.yml that the script downloaded ships with a placeholder key, so the broker will not start until you replace it.
Open the file, find the TBMQ_LICENSE_SECRET environment variable, replace YOUR_LICENSE_KEY_HERE with your license key,
then re-run the script to apply the change:
./tbmq-install-and-run.shOpen http://localhost:8083 and wait until the services are up. Log in with the default system administrator account:
| Field | Value |
|---|---|
| Username | sysadmin@thingsboard.org |
| Password | sysadmin |
TBMQ then prompts you to change this password. Set a new one, or click Skip to keep the default for now.
A new installation has Basic authentication enabled, while X.509, JWT, SCRAM, and HTTP authentication are switched off. So the broker refuses every client that does not match a stored credentials record — create one before you connect a client:
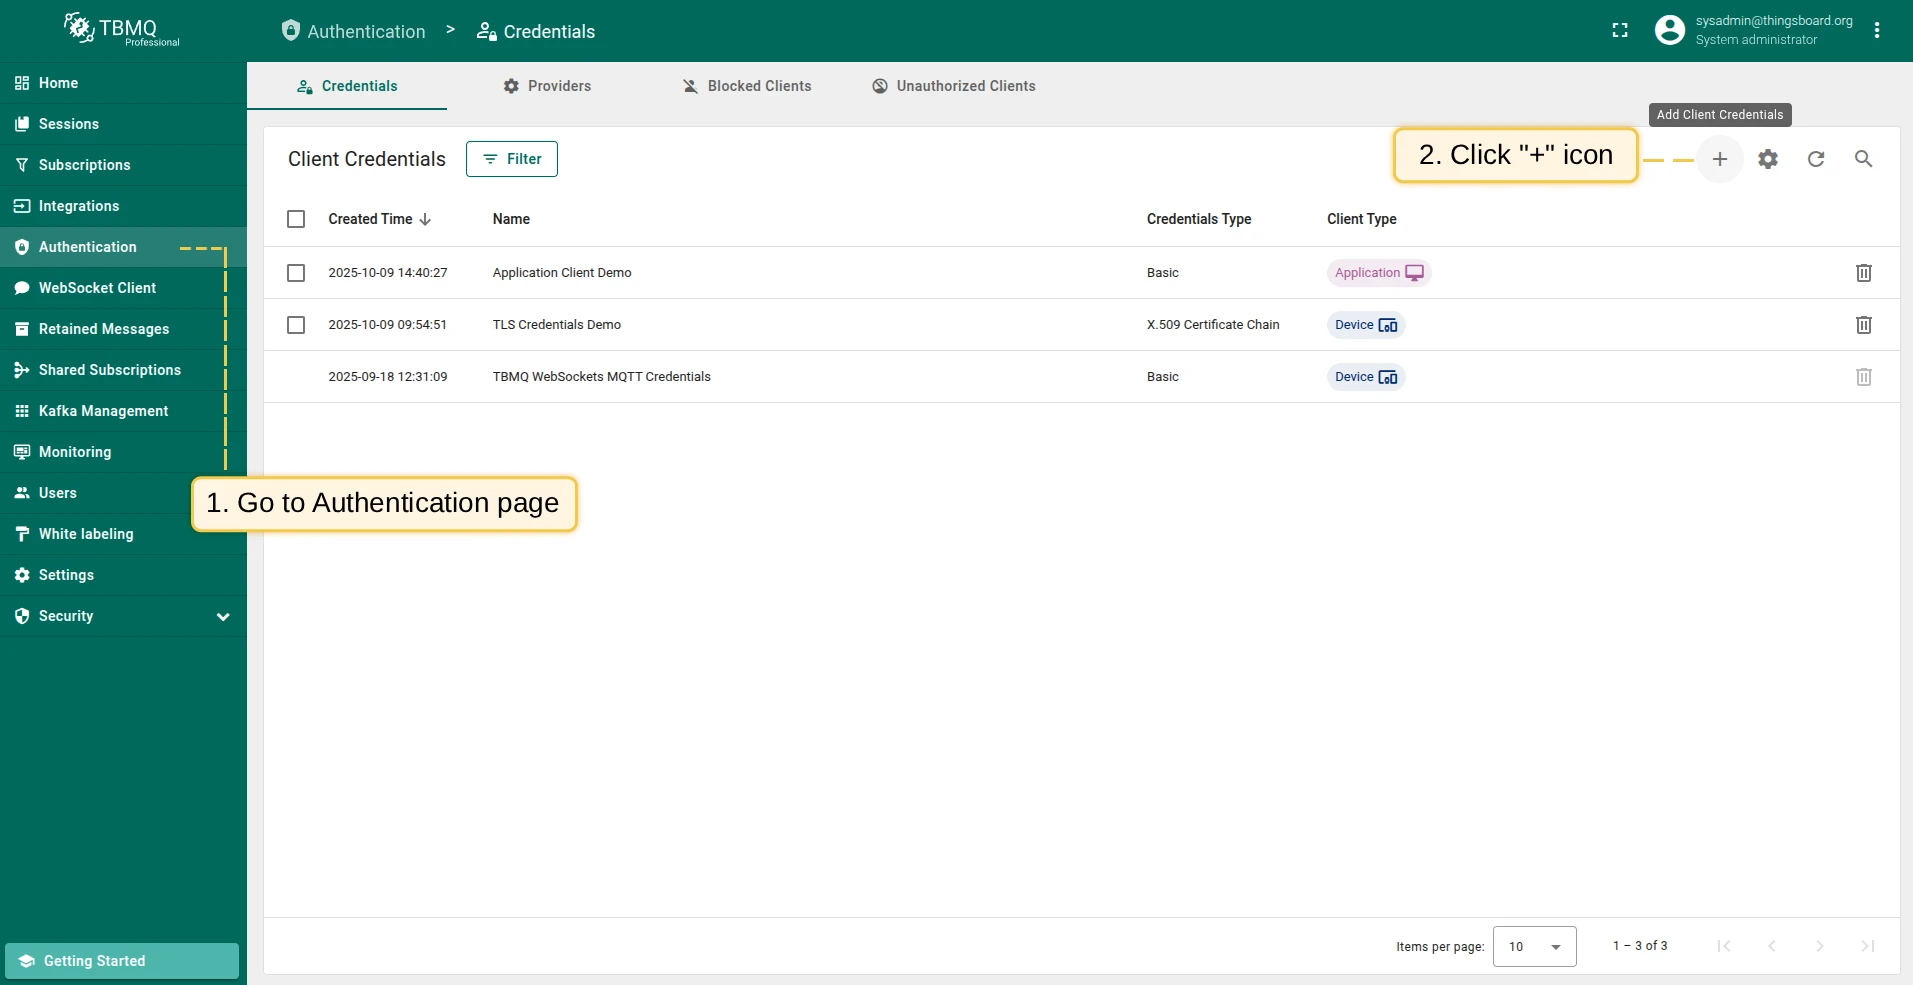
Open the credentials page.
Go to Authentication → Credentials and click Add (+).
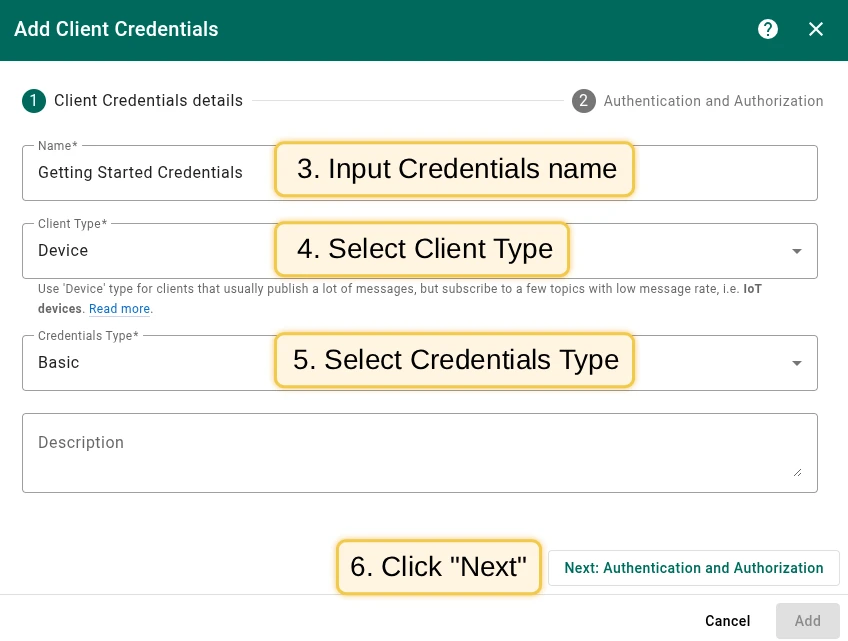
Name the credentials.
For example, Getting Started Credentials.
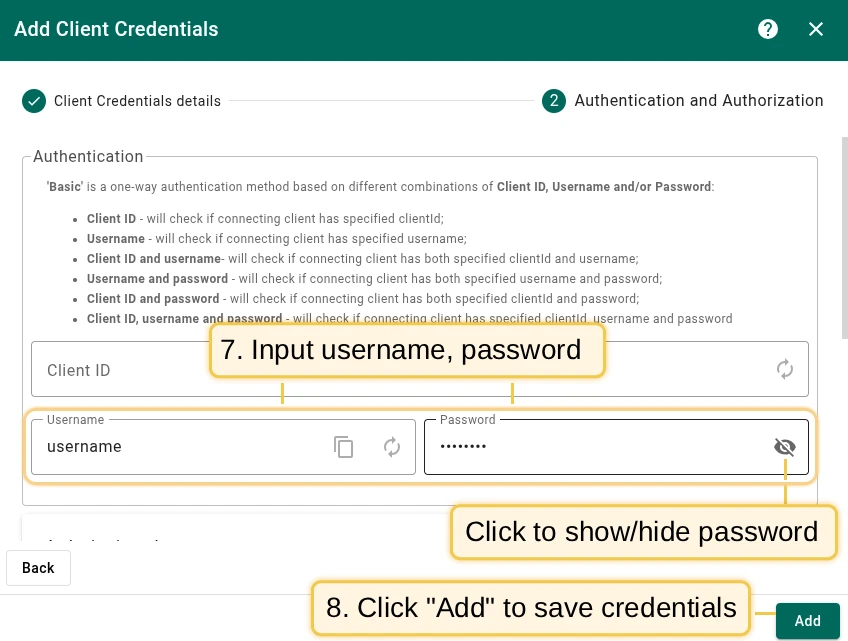
Set a username and password.
Use values of your choice — this guide assumes username and password.
Leave the authorization rules untouched: both the publish and the subscribe pattern default to .*, which permits any topic.
Save.
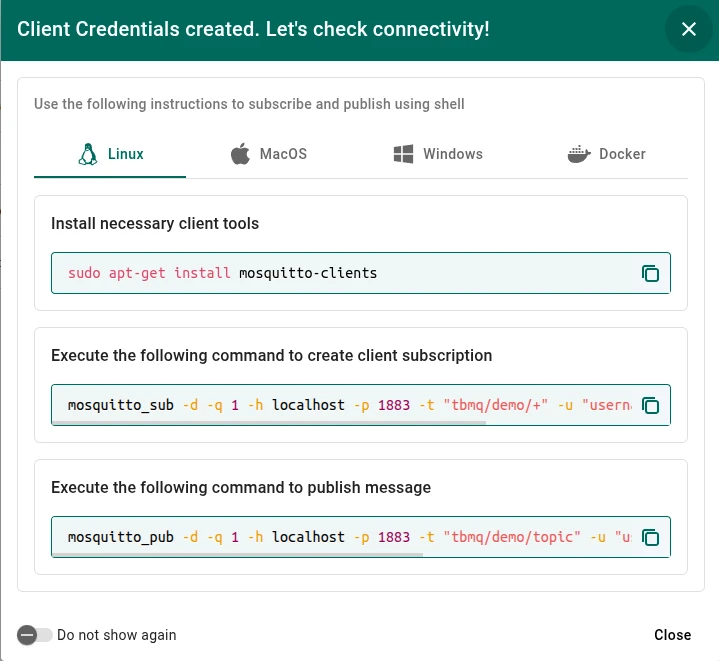
Click Add. The Check connectivity dialog opens with ready-made mosquitto commands for the credentials you just created.
To review which providers are active, open Authentication → Providers, or use the Broker Settings card on the Home page. For the other authentication methods and for transport security, see Security overview.
Now move a message through the broker. You can do it entirely in the browser with the built-in WebSocket client, or from a terminal with a command-line client.
A fresh installation already contains a WebSocket Default Connection that points at ws://localhost:8084/mqtt
and carries one subscription to sensors/# with QoS 1 — enough to publish and receive without any setup:
Connect.
Go to the WebSocket Client page and click Connect. The connection status changes to Connected.
Publish a message.
In the message composer, set Topic to sensors/temperature, enter 32 as the payload, and click the Send icon.
Check the result.
The message shows up twice in the Messages table: once as Published, and once as Received — delivered back to
the same client through its sensors/# subscription.
For connection settings, subscription options, and MQTT 5 message properties, see WebSocket client.
The examples below use Mosquitto clients — see the mosquitto_sub and mosquitto_pub documentation for the full option list. Run each command in its own terminal, the subscriber first.
Subscribe to the sensors/temperature topic:
mosquitto_sub -d -h demo.tbmq.io -p 1883 -t sensors/temperature -q 1 -u demoPublish a message to the same topic:
mosquitto_pub -d -h demo.tbmq.io -p 1883 -t sensors/temperature -m 32 -q 1 -u demoIf you signed up for a demo account, log in to demo.tbmq.io and open the Sessions page to find the session your subscriber just created.
Subscribe to the sensors/temperature topic:
mosquitto_sub -d -h localhost -p 1883 -t sensors/temperature -q 1 -u username -P passwordPublish a message to the same topic:
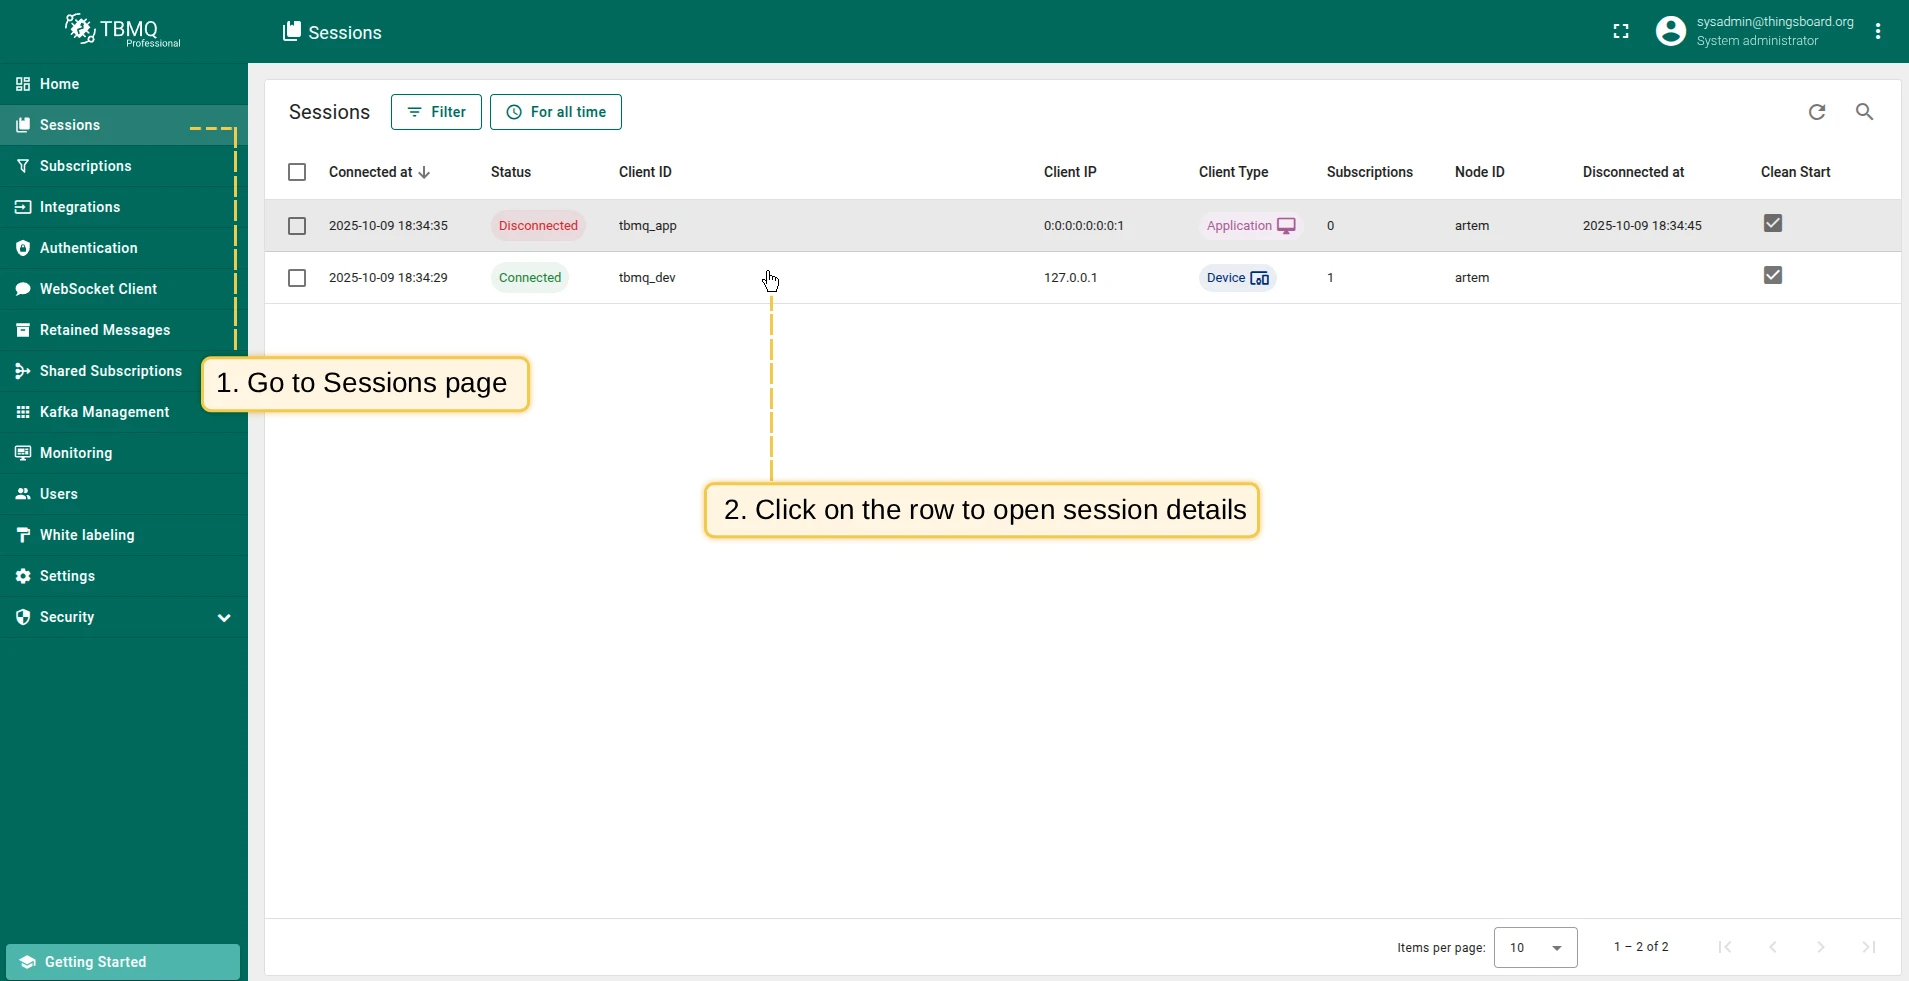
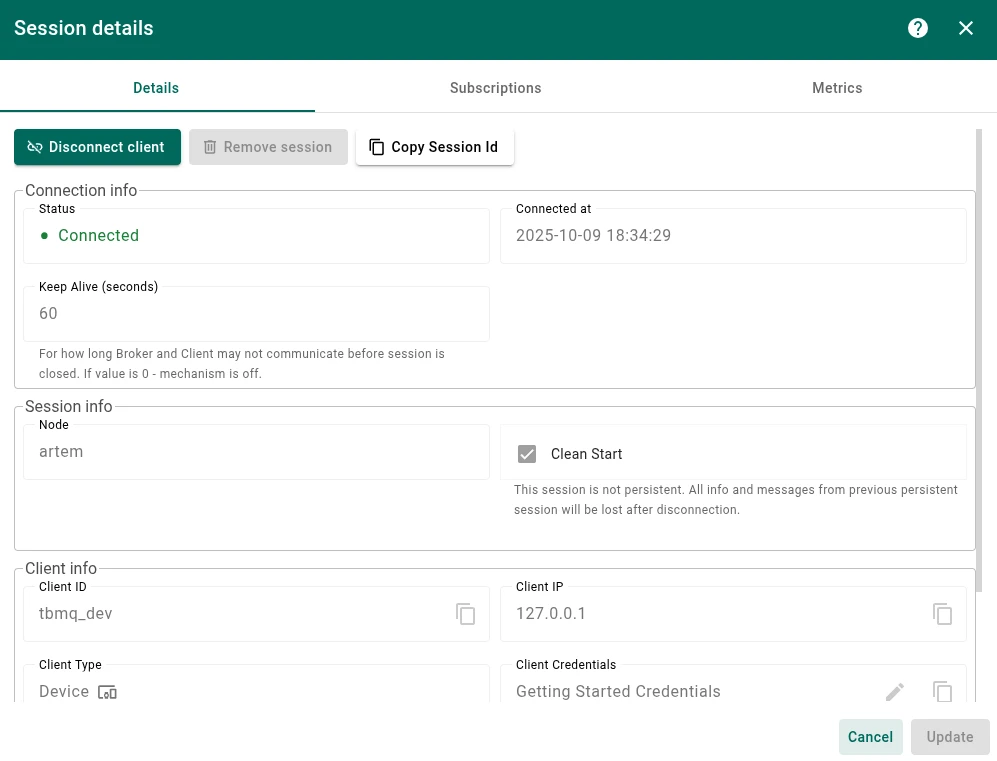
mosquitto_pub -d -h localhost -p 1883 -t sensors/temperature -m 32 -q 1 -u username -P passwordWhile the subscriber is connected, open the Sessions page and click its row to inspect the session — client type, subscriptions, and connection details.
The subscriber prints the payload as soon as the publisher sends it:

Client types, sessions, topics, and QoS — the model behind everything you just did. Start with Client types.
Add TLS listeners and choose the authentication provider that fits your clients. See Security overview.
Track sessions, throughput, and resource usage as traffic grows. See Monitoring.
Stream messages to Kafka, an HTTP endpoint, or another MQTT broker. See Integrations.
Was this helpful?